Pony's Dragon Hunting guide
If you want to reach out to me to ask any questions, correct or add some information to this guide, please reach out to me on Discord. My user id is ponywarrior.
11/03/2023 : Added new jackpot partners, added pet control guide.
Introduction
After reaching level 99+30, you are able to access the celestial lair, the act 8 of Nostale. The celestial lair is composed of a variety of maps, each with different sets of mobs, elements and layout, with a majority of the maps viable for farming. Compared to act 7 which only really had spirit forest, this is a massive improvement.
In this guide you will learn all you need to know in order to farm efficiently in the celestial lair.
Once you gain access to the celestial lair, you also gain access to moritius island, act 7. It's very important for you to complete the daily mob kill achievements for act 7 & 8, as together they grant 100% of level 99+70's experience as reward, which at level 99+30 is 13 levels.
The maps
There are 11 maps with a rift in the celestial lair, which are the following :
- Eastern Skytrail
- Lakeside Gorge
- Dragon Ranch
- Northern Skytrail
- Frozen Lake
- Ice Dungeon
- Gorge Path
- Gravel Gorge
- Dragon's Lair
- Path of Destiny
- A. Dragon's Lair
Of these, all are viable for farming. However some maps are better than others, and this is what we'll be looking at in the next section.
Rifts overview
Cloud rifts
These 3 rifts are grouped together as they are the same map with different mobs. Each one is a flat square with no obstacles. More importantly, they are extremely easy to farm, to the extent that they are even easier to farm than act 7 rifts, and make around the same money per hour.
The best one is Eastern Skytrail, due to the mobs being melee, making them easiest to lure.
These rifts have the lowest gear requirements of all act 8 rifts and therefore are ideal for new players, but their simplicity and decent loot also makes them ideal for chill and relaxed farming sessions for any player.
-
Eastern Skytrail
Light element.
-
Northern Skytrail
Water element.
-
Path of Destiny
Fire element.
Mid tier rifts
These rifts are called mid tier based on these criterias :
- Requires having good gear
- Requires pet management
- Moderate farming efficiency
In simple terms, they require you having adequate gear, luring using your player and pets, and reward good loot.
What makes them 'mid' tier is that for the effort invested you would be better rewarded in a high or S tier map, and could farm cloud rifts for less effort while not losing too much income. Overall they are not recommended, with the exception of Frozen Lake during leveling.
-
Frozen Lake
Water element.
Best leveling rift between levels +66 and +74.
-
Gravel Gorge
Water and Shadow elements.
-
Lakeside Gorge
Water and Shadow elements.
High tier rifts
These rifts are great for farming but still a tier below the best rifts.
-
Dragon's Lair
Shadow element.
Is actually almost an S tier rift for mage players, as they are unaffected by the rift's biggest issue, the
 Smog inflicted by
  Decayed Dragon Hunter.
What holds it back from S tier is the low mob count of 93 for a full clear and
Decayed Dragon Hunter.
What holds it back from S tier is the low mob count of 93 for a full clear and  Paralysing Toxin inflicted by Dragon Hunter Zombie also randomly losing you time.
For Swordsmen, Archers and Martial Artists it is not an ideal map due to
Smog being so crippling in addition to Paralysing Toxin.
S tier rifts
These rifts are S tier because they have the highest possible kill counts along with the best loot, so the best farming efficiency. However they have the downside of also having the highest gear requirement.
And really, the gear requirement on these rifts is not a suggestion, but a real necessity. While you can farm these rifts with bad equipment, you will lose a ton of potential income. The exception to this is during leveling, as getting the best experience gain matters more than making the best money at that time.
-
Gorge Path
Water, Fire, Light and Shadow elements.
A rift consisting of 3 maps linked together in a serie, similar to the Celestial Spire rift in act 7.
It is the rift with the most consistent income and highest possible kill count. All classes have multiple viable specialists for this rift.
However it is also the rift with the highest skill requirement, as very good pet management, mob pathing manipulation and skill rotation management is required to perform well.
-
Ice Dungeon
Water element.
This rift is only better than Gorge Path if you sell your
 Ice Dragon's Magic Sphere in the bazaar at a good price, as otherwise selling it to NPCs makes it worse than Gorge Path. This dependance on market price for its loot means it may fall to a lower tier depending on player demand for the item.
Unfortunately, it is also the rift with the highest gear requirement, especially for Archers.
Best leveling rift between levels +75 and +79.
Undetermined rifts
I do not have enough personal experience or gotten enough information from other players to give them a proper evaluation, therefore at this time they remain undetermined.
-
A. Dragon's Lair
Water, Fire and Light elements.
This rift consists of 2 maps linked together by a portal.
Because the second map has no portal leading to the start of the first map, setting a return point at the start of the first map is required.
The difficult layout coupled with 2 out of 3 mobs in the rift being ranged makes it difficult to lure, and mandatory to use Panda and Amon. Worse is that even two pulls are likely not enough and the highest farm efficiency would require playing as
 Warrior Specialist Card or
  Tide Lord Specialist Card for a third pull.
The unique mob drop
 Guardian's Magic Orb from this rift has no demand due to not being used for anything and the experience isn't better than Ice Dungeon, which overall likely makes this map mid tier.
 -
Dragon Ranch
Light and Shadow elements.
While at first glance it seems like a terrible rift, it may have potential for two reasons :
 Monkey Hat almost entirely negates the obscene stun chance of the mobs by itself.
 Baby Triceratops spawn a
  Triceratops on death, which means each one is essentially two mobs instead of one.
This rift however cannot be lured with pets due to the mobs' stun chance and must be left at a safe place.
I personnally haven't given this rift a serious try, and do not know anyone who has. Therefore I cannot definitely say how good or bad this rift is yet.
Pet control guide
This section will cover how to control your pets, as good pet control is required to lure effectively in act 8, but also in general.
In Olympus, you can control your pets with different keys : F1, F2, F3, F4, A, S, D, F.
Command keys
The ones that matter the most are the commands keys, ASDF.
A : Attack move. After a press, click an area and your pets will go there, attacking any enemies on the way. Once arrived they will stay there, but will retaliate if attacked by enemies.
S : Stop. After a press, your pets will stop and stand in place until they die or you order them again.
D : Return. After a press, your pets will move towards you.
F: Move. After a press, click an area and your pets will go there, ignoring any enemies on the way. Once arrived they will stay there, but will retaliate if attacked by enemies.
Control keys
The control keys, F1-4, change which character you control when pressing them. Theoretically they allow the greatest pet control, but in practice require really good multitasking and practice.
When switching control, the characters that become inactive (orange circle) will follow the last command issued.
F1 : Control player. Pet and partner become inactive.
F2 : Control partner. Player and pet become inactive.
F3 : Control pet. Player and partner become inactive.
F4 : Control all. Returns control of your player with your pets following.
Note : You can also Ctrl+Left click drag an area to select multiple characters to control, for example Player+Partner or Partner+Pet.
Recommended usage
It's best to focus on the SDF command keys as they are the simplest way to control your pets. Most importantly, with the Move (F) key you can click on the minimap instead of the ground to send your pets somewhere.
Therefore the recommended flow of commands is the following :
Move (F) your pets around to lure mobs, Stop (S) your pets where you want to clear the lure so they don't spread the mobs around, make your pets Return (D) after the lure is cleared.
Individual rifts farming guide
This section of the guide will group 'mini-guides' for each rift, which includes specialists to use for each class, partners, pets, tattoos and luring strategies.
If you don't have good gear or don't know how to gear for farming, check out the gear guide.
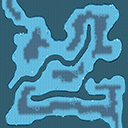
Eastern Skytrail
This guide will cover the Eastern Skytrail rift. For new players with bad gear this is the ideal place to farm.
Overview
Here is a picture of the rift :

The map is completely flat with no obstacles, while the mobs are arranged in a = shape.
Specialists
Here are the recommended specialists for each class :
- Swordsman
 Berserker Specialist Card.
- Archer
 Demon Hunter Specialist Card.
- Mage
 Seer Specialist Card.
- Martial Artist
 Demon Warrior Specialist Card or
  Hydraulic Fist Specialist Card.
Luring
There is only one good luring method for this map, which can be seen below :

- Left side shows the area of each lure
- Middle shows player path
- Right side shows pet path
All you need is either Panda or Amon. Do this pathing 3 times then you should be at minute 54 of your rift, at which point you exit and re-enter the rift. This will instantly respawn all mobs. Repeat this as long as you want.
Gorge Path
This guide will cover the Gorge Path rift. For end game players looking to make good money farming this is a great rift.
Overview
Here is a picture of the rift :

As you can see each map in the serie has a vastly different layout. The portal at the end of map 3 leads to the start of map 1, completing the loop.
Each map has the following mobs :
- Gorge Path 1
 Giant Mushroom Archer 202.491 HP
 Giant Mushroom Swordsman 207.491 HP
 Giant Mushroom Mage 192.491 HP
 Gremlin 171.315 HP
 Gryphon 311.703 HP
- Gorge Path 2
Giant Mushroom Archer 202.491 HP
Giant Mushroom Swordsman 207.491 HP
Giant Mushroom Mage 192.491 HP
Mischievous Gremlin 331.703 HP
Gryphon 311.703 HP
 Lava Dragon 216.703 HP
- Gorge Path 3
Mischievous Gremlin 331.703 HP
Shadow Gryphon 322.095 HP
Lava Dragon 216.703 HP
Giant Lava Dragon 347.095 HP
As can be seen the toughness of each mob has a large range, with all the mobs above 300.000 HP being your gear checks. Giant Lava Dragon are the reason fire specialists are the worst on this map, as they are the toughest mob in the rift, requiring extremely good gear to clear fast and consistently.
Specialists
Here are the recommended specialists for each class :
- Swordsman
- Berserker Specialist Card. Fastest sword sp, high damage and low cooldowns. Overall the best choice.
 Renegade Specialist Card. Good choice but not as good as Berserker.
- Archer
 Avenging Angel Specialist Card. Fast, high damage, low cooldown. Requires a setup for either
  Ice or
  Flame buff but is overall the best choice.
 Wild Keeper Specialist Card. Good choice but not as good as Avenging Angel. Does not require a dagger set however.
- Mage
 Archmage Specialist Card. Fast, very high damage and low cooldowns. Recommended for most players but not the best choice for top tier farming.
 Gravity Specialist Card. The massive aoe and damage of
  Zero Gravity will always kill in one hit ranged monsters that would otherwise require a pull, while
  Black Hole can pull and one shot entire lures.
Does not need any extra pull from your partner or pet, freeing you to use Fiona and Pix, although Panda is recommended until you can manage without it.
Is the best choice for top tier farming but requires excellent gear and a lot of practice to realise its potential.
- Martial Artist
- Hydraulic Fist Specialist Card. Fast, high damage and huge aoes, the best choice overall.
- Demon Warrior Specialist Card. Worse than Hydraulic Fist in all aspects but still viable.
 Draconic Fist Specialist Card. Can be used with top tier gear but is slower than Hydraulic Fist even then.
Lures
Depending on your gear and ability there are multiple luring strategies you can follow. Those will be noted as 123, where each number represents the number of lures per map.
111 lure
This lure is the simplest and recommended for beginners. It requires you to have at least 1 pull with medium cooldown.
With good execution you can expect 3100 to 3300+ kills in 60 minutes.

- Left side shows the area of each lure
- Middle shows player path
- Right side shows pet path
212 lure
This lure is best for players with some experience farming the map already, have good gear, but can't keep up with the 222 lure clear speed requirement yet.
It requires you to have at least 2 pulls with medium cooldowns.
With good execution you can expect 3300 to 3500+ kills in 60 minutes.

- Left side shows the area of each lure
- Middle shows player path
- Right side shows pet path
222 lure
This is the best luring method to maximize farming efficiency, however it is very demanding and not recommended for beginners.
It requires you to have at least 2 pulls with medium cooldowns, high movement speed and enough damage to always clear a lure in 3 skills or less.
With good execution you can expect 3500 to 3750+ kills in 60 minutes.

- Left side shows the area of each lure
- Middle shows player path
- Right side shows pet pat
Ice Dungeon
This guide will cover the Ice Dungeon rift. For end game players looking to make good money farming, or new players leveling this is a great rift.
Overview
Here is a picture of the map :
Basically a very long path with a large open area at the end.
The map has the following mobs :
 Ancient Ice Golem 408.292 HP
 Darkfrost Snowman 423.292 HP
 Ancient Frost Stag 423.292 HP
 Alzanor's Son 443.698 HP
Every monster has more than 400.000 HP, which is huge. This is the reason this map has the highest gear requirement, as melting these hp pools requires good gear. Because of this fire specialists are the best choice generally, though with top tier gear other elements are viable.
Here are the recommended specialists for each class :
- Swordsman
- Warrior Specialist Card. Good damage and his
 Provoke is the best pull in the game, which also frees up either your partner or pet.
- Archer
 Fire Cannoneer Specialist Card. Good damage, speed and many large aoes, best choice for archers.
- Mage
 Volcano Specialist Card. Great damage, speed and many aoes, best choice for mages.
 Red Magician Specialist Card. Slightly worse than Volcano due to its lower movement speed, but still a good choice.
- Martial Artist
- Draconic Fist Specialist Card. Good damage, but has limited aoe skills, meaning you need to have very good gear to clear consistently.
Point of return
Before you start luring you need to set your return point as indicated in the picture below. No matter which lure you do, you will always use your return amulet at the point indicated in the picture.

Lures
Depending on your gear and ability there are multiple luring strategies you can follow. Those will be named according to how many lures are done per loop, for example 3 lures.
3 Lures
The beginner lure, if you are leveling this is the lure you should do as it leaves enough time for all your cooldowns to be up for the next lure.
It requires you to have 1 pull with medium cooldown.
With good execution you can expect 2600 to 2700+ kills in 60 minutes.

- Left side shows the area of each lure
- Middle shows player path
- Right side shows pet pat
During the first lure, once your pets have reached the middle of the path make sure to stop them for a few seconds or some mobs will lose aggro.
6 Lures
This is the lure you should be doing if you're not leveling. Requires at least 2 pulls and very good gear to clear fast and consistently. If you can't keep up with the speed and damage needed you should do Gorge Path instead.
With good execution you can expect 3000 to 3200+ kills in 60 minutes.

- Left side shows the area of each lure
- Middle shows player path
- Right side shows pet pat
If you are fast enough, when you get to the second lure it will still be respawning. Here you can do either :
-
Stop your pets and continue forward with your player, then when the mobs have respawned make your pets follow, letting them aggro half the lure on their way to you, which is much faster than luring everything with your player.
-
Split this lure into two smaller lures.
Gear guide
In this part we will go over the gear needed for farming in act 8. This includes weapon and armor shells, runes, equipment, accessories, fairies, costumes, specialists, partners, pets, tattoos, skill books, titles, consumables and special items.
Weapon Shells
When looking for a weapon there are 3 option types to consider :
- Damage options : Enhanced Attack, Increase Overall Attack, Increase Damage to Low-Level Races, Increase XXX Element, Increased Chance of Critical Hits, Increased Critical Damage, Undisturbed When Casting Spells.
- SL options : Increased Overall SL Stat, Increased SL Attack, Increased SL Element.
- Special options : Gain more Gold (Main weapon only). Please note this option exclusively works on main weapons and does nothing on secondary weapons, unlike official Nostale.
Your damage weapon needs to have as many damage options as possible, while your support weapon needs to have SLs. Note for archers that if you're playing a dagger specialist your damage weapon is your dagger, while your bow is your support weapon. All options are not equally as important however. Note the option tier and max roll for each option.
- For damage weapons :
-
Must have - Do not buy a weapon without those options
-
Increase Damage to Low-Level Races B (18%), Increase Overall Attack S (16%) : Not having those options is a huge loss of damage and immediately disqualifies the weapon.
-
 Undisturbed When Casting Spells C : Must have option for mages, as without it you will almost always be interrupted by large packs of mobs hitting you.
 -
Gain More Gold (Main weapon only) A (25%) : This option alone makes a few extra millions of gold per hour, absolute must have.
-
-
Important - Try to buy a weapon that has those options
-


 Increased Chance of Critical Hits B (9%) : Increases consistency of lure clears but the randomness of crits cannot be relied on.
 -
Increased SL Attack A (15), Increased SL Element A (15) : Having either one on your main weapon will make it much easier and cheaper to find a secondary weapon.
-
-
Optimization - Consider these options when looking for the perfect weapon
-
Enhanced Attack A (160) : Increases your attack by a flat amount. While a good option, the damage increase is not massive.
-
Increased Critical Damage B (50%) : Good option but not as good as critical chance.
-
Increase XXX Element A (200) : While a good option, it's very hard to find a weapon that has all the previous requirements and this option with the element(s) you are using.
-
- For support weapons :
-
Must have - Do not buy a weapon without those options
-
Increased Overall SL Stat S (10) : Stacks with single SL options, which lets you gain up to 25 free points for your specialist in a stat.
-
Increased SL Attack A (15), Increased SL Element A (15) : If your main weapon has either one, then the other becomes a must have option. If your main weapon doesn't have any, get the most important SL option for your class, as support weapons with overall-attack-element SLs are obscenely expensive and rare.
If you can find and afford to buy one be sure to get it though. Make sure your overall + attack/element SLs equal 20 or higher. -
Gain More Gold (Main weapon only) A (25%) : Makes a lot of extra gold with time, must have option if you plan to farm a lot.
-
-
Optimization - Consider those options when looking for the perfect weapon
- Increase Damage to Low-Level Races B (18%), Increase Overall Attack A (8%) : Not necessary but good to have for Demon Hunter.
Weapon Rune affixes
While runes were not needed for farming in act 7, in act 8 they very much are. In this section we will go over the different affixes you can roll on a rune. Rune powers are discussed in the next section.
When it comes to rune affixes, they can be classified into 4 categories :
Weapon Rune Powers
Of the 10 rune powers, only 2 are useful to have when farming. They are :
-
 Agility Power (Level 6)
- If you manage to get it at a high level, it makes a huge difference. It will proc every lure, essentially giving you a speed and cdr buff a majority of the time.
-
 Frost Power (Level 6)
- Only useful for mages, as water specialists of other classes are not viable for farming. With a high level it will usually proc on your first attack on a lure, which will then be massively debuffed.
The reason for only these two powers being useful is that the other powers are either defensive or single target debuffs, which has very little use in farming.
Unfortunately rune powers have a big issue, which is the chance to get the ones you want. Theres a 10% chance to get any one of them, and rerolling runes for specific powers along with the right affixes is very expensive.
However there is a silver lining to this RNG, runes can only have two powers. So if you roll the power you want at +3 or +6, then +9, +12, +15, +18 and +21 won't add extra powers but instead increase the level of either one of your powers.
I strongly recommend all players wanting to farm seriously to roll for Agility Power (Level 6) even if you have to spend weeks in Carno marathons, as it really is worth it.
Armor Shells
For your armor shell, the only thing you need is Chance of All Negative Effects Reduced S (30). In act 8 no other shell affix matters.
Armor Runes
With act 8 armor runes have been added. As they were made for PvP almost everything armor runes provide is useless when farming, with two exceptions :
- Up to level 4 there is a _% chance of never getting a bad effect
-
 Power of the Flame (Level 6)
While the affix is more for optimization, every player should have  Power of the Flame (Level 1) on their farming armor. Rolling an armor rune to +3 for it isn't very expensive, and even at 1% chance, with the large amount of hits you receive it will often proc and debuff most of the lure.
Rune engraving tips
Here are some useful tips to help you get the best possible rune for your weapon.
- A rune can only have up to 5 different affixes and 2 different powers.
This means if your rune has PvE damage, all 3 great affixes and 1 acceptable affix, when you upgrade it can only increase the level of one the 5 affixes and won't add any more. Now the only potential issue is if PvE damage isn't upgraded enough, in which case you should delete and retry or use solvent if you're past +12.
For rune powers this works the same way, if you get Agility Power  Agility Power (Level 1) and any other power, when you upgrade your power it can only increase the level of either one.
Getting your ultimate rune will be a long and hard road, I wish you luck.
Equipment
In this part we will go over the best masks, hats, gloves, shoes, accessories and trophies.
- Masks
 Dragon Knight Mask. No other mask in the game comes close to being comparable, so this is the only option.
- Hats
-
 Precious Dragon Horn Crown. The best hat in the game.
 -
 Laurena's Witch Hat. Ideally you want to switch to this hat while luring, then switch back to Precious Dragon Horn Crown before attacking the lure.
- Gloves
Note that summing to s5/s6 is not needed at all. Summing to s2 with  Damned Gloves is sufficient for PVE content in general and has no risk of failure.
-
 Dragonlord Gloves. Best option for non-mages. The hitrate increases lure clear consistency while the fairy attribute increase raises elemental damage slightly.
 -
 Flying Dragon Gloves. Slightly worse but cheaper version of Dragonlord Gloves.
 -
 Ancient Beast Gloves. Worse but cheaper version of Flying Dragon Gloves.
 -
 Spirit King Gloves. Gives the same damage boost as Dragonlord at a fraction of the cost. Recommended option for mages in all PVE content.
 -
Damned Gloves. Entry level gloves for new players.
- Shoes
Note that summing to s5/s6 is not needed at all. Summing to s2 with  Sacred Boots is sufficient for PVE content in general and has no risk of failure.
-
 Fernon's Shoes. The only shoes in the game to give +2 speed, they are the best shoes for farming.
 -
 Spirit King Shoes. If you can't afford Fernon Shoes, use these until you can afford Fernon Shoes.
 -
 Fast Shoes Entry level shoes for new players, get them from the level 24 time space.
- Accessories
-
 Dragon Claw Ring,
  Dragon Necklace,
  Carved Dragon Bracelet. In total gives +100 to all attacks, +10 fairy attribute level and +15% PVE damage. Avoid buying as the very few you may find in bazaar will be extremely expensive, and craft them instead.
 -
 Orc Hero Ring,
  Beastheart Necklace,
  Spirit King's Bracelet. +10% damage dealt in total. For new players, use these until you can equip the c72-78 accessories.
- Trophies
-
 Twilight Gem I,
  Twilight Gem II,
  Twilight Gem III. The first trophy every player should get, it's the default for PVE content. However it was nerfed in act 8 from 15 drain and 15 fairy attribute to 10 each. Even with the increased drain from c80 weapons compared to c60 weapons, Twilight Gem remains the best damage option for PVE.
 -
 Chronos' Hourglass I,
  Chronos' Hourglass II,
  Chronos' Hourglass III. Unless you have extremely good gear you may not clear lures as fast with Chronos' Hourglass than with Twilight Gem. However, what you should be doing is switching to Chronos' Hourglass while luring for the +2 movement speed, then switching back to Twilight Gem before attacking the lure.
 -
 Forbidden Berries. The trophy from Ginseng, use this until you have Chronos' Hourglass III.
- Fairies
-
 Fernon (Fire),
  Fernon (Water),
  Fernon (Light),
  Fernon (Shadow). The strongest fairies in the game, they are the best you can use when farming. However they are extremely expensive and not something new players can afford. Like Erenia and Zenas fairies they don't have to be leveled, they're at the maximum attribute level already.
 -
 Erenia (Fire),
  Erenia (Water),
  Erenia (Light),
  Erenia (Shadow). A tier below Fernon fairies but much cheaper.
 -
 Zenas (Fire),
  Zenas (Water),
  Zenas (Light),
  Zenas (Shadow). Same as Erenia fairies.
 -
 Elkaim,
  Ladine,
  Rumial,
  Varik. The divine fairies. They start at 50% and can level up to 80%. Far cheaper than Erenia, Zenas, and Fernon fairies while not being that much worse. They are what I recommend for new players, as you will need to get multiple of them to craft your Fernon fairy anyway.
 -
 Grown Sellaim,
  Grown Woondine,
  Grown Eperial,
  Grown Turik. The original nosmall fairies. They start at 40% and can level up to 70%. While they are the cheapest option by far, once you get to a point where you want to upgrade they have no other use unlike divine fairies, and all you can do is delete them. For new players I recommend to keep using your starter fairy and save up for a divine fairy.
- Costume hats
-
 Tropical Hat (Permanent). The only thing in the game that increases the amount of loot we get, this is a must have for serious farmers. However, the
  Tropical Costume Set is very expensive and will take a long time to recoup with the bonus loot you get from it, so it's a waste of money if you don't farm a lot.
 -
 Ice Witch Hat (Permanent),
  Fire Devil Mask (Permanent),
  Honeybee Crown (Permanent),
  Death Lancer Skullcap (Permanent). The vessel event costume hats. If you also have the vessel event pet of the same element, the effect stacks to 30% chance and 35% damage. They are very strong, as the proc chance is rolled for each target you hit; meaning every time you attack a pack of mobs the effect will proc multiple times, and when it procs the mob hit will most likely be one shot.
 -
 Viking Helmet (Permanent). Strongest flat damage costume hat. Has no RNG compared to vessel event costume hats but is worse for farming.
 -
Any costume hat with a 5% damage buff.
- Costumes
-
 Rocketeer Costume (Permanent). The only costume in the game that increases our damage, and even has +2 movement speed. However the
  Rocketeer Outfit Set is very expensive so for new players I recommend using the costumes below.
 -
 Wonderland Costume (Permanent),
  Puppet Master's Dress (Permanent),
  Red Detective's Suit (Permanent). They all give +2 movement speed, buy the cheapest one you can find.
- Costume Wings
-
 Paimon's Costume Wings (Permanent). The strongest costume wings in the game. However, very unfortunately they don't give any movement speed unlike every other costume wing. So for them to be better than Rocketeer Wings you need to switch them in and out like your trophy and hat. This adds one more key press every lure for little benefit. Even worse is to get them you need to trade 2000
  Infinity Coin at the Celestial Spire Shop, which takes a very long time to grind. If you want to buy them from a player it's just not worth the cost, as they cost more than a Tropical Costume Set, a Rocketeer Outfit Set and a
  Baby Panda combined.
 -
 Rocketeer Wings (Permanent). They work the same way as vessel event costume hats and pets, even if the proc chance is lower. Also give +1 movement speed unlike Paimon's Costume Wings, which makes them the ideal costume wings for farming.
 -
 Tropical Costume Wings (Permanent). Generally the best costume wings for farming due to the gold gain, however if you lack damage you will be better off using Rocketeer.
 -
Except for the RBB costume wings, get the cheapest costume wings you can find as they all give +1 movement speed.
- Costume Weapons
-
 Imp Cudgel Skin (Permanent),
  Wildflower Bow Skin (Permanent),
  Uchiwa Skin (Permanent),
  Jasmine Gauntlets. The Geisha skins. They are the best Costume Weapons in the game for PVE. Except for Martial Artists, they are very expensive.
 -
 Steampunk Chronoblade (Permanent),
  Steampunk Clockwork Bow (Permanent),
  Steampunk Geared Wand (Permanent),
  Steampunk Gauntlets. Worse than Geisha skins while still being expensive. Except for Martial Artists because the gauntlets are dirt cheap, I don't recommend them at all, as you're better off saving up for a Geisha skin.
Specialist
Here we will go over specialist wings, points, perfection and blessing.
- Wings
-
 Blazing Fire Wings,
  Frosty Ice Wings,
  Archangel Wings,
  Archdaemon Wings. The elemental wings. They each give 10 drain, 100 element and +1 movement speed. They are the default specialist wings for all PVE content and recommended for new players.
 -
 Gilded Wings. If you can afford to lose the elemental wing buff and still clear lures fast and consistently, they are a good option thanks to the higher speed and gold gain.
 -
 Petal Wings. Basically mage-only specialist wings, they work the same way as vessel event costume hats. On average they are better than elemental wings for damage, but rely on RNG. However the higher speed bonus makes up for it. For mages that don't have enough damage to switch to Zephyr Wings yet they're a solid option, and worse than Gilded Wings for other classes.
 -
 Zephyr Wings. Highest movement speed specialist wings in the game, for top tier farmers they are the best specialist wings. Not recommended if you can't make use of the speed.
- Points
Upgrading your specialist and having good SL shells is crucial to being able to have high stat points, as they are the biggest source of damage after weapons.
When setting your points the only stats which matter are Attack and Element. You should first put points in your main stat until you reach 100, then put the remaining points in your secondary stat. If your specialist is +16/17/18/19/20, instead of 100 put points until you reach 105/110/115/120 in your main stat, depending on upgrade level.
-
Main stat is Attack, secondary stat is Element.
-
Main stat is Element, secondary stat is Attack.
- Perfection
When looking for a PVE specialist, only two perfection stats matter, Attack and Element. Just like points you want to focus on the main stat for your class
- Attack : Each point grants 10 attack.
- Element : Each point grants 1 element.
A good specialist should have a sum of 70 or higher when adding these two stats together, with at least 40 in your main stat. For a specialist you want to upgrade above +15, it should have a sum of at least 80, with at least 50 in your main stat. However I would recommend only upgrading a specialist to +19 and +20 if its sum is 95 or above.
- Blessing
Once you upgrade your specialist to +20 it gains the  Dragon Blessing. The default one does not grant a buff on activation, however the 4 you can craft and add to your specialist do.
They are the following :
-
 Fire Dragon Gem grants
  Fiery Breath.
 -
 Ice Dragon Gem grants
  Icy Breath.
 -
 Moonlight Dragon Gem grants
  Moon Shadow.
 -
 Sky Dragon Gem grants
  Heavenly Light.
While each buff is good thanks to every one giving 10 drain, unfortunately the blessing only procs per damaging skill use, similar to  Lunar Wings which only procs per attack, and how many targets you hit does not affect the chance to proc it, making their value very low. Use the gem corresponding to your specialist's element for the best results, but it won't affect your farming very much.
Partners
Here are the best partners of each class type.
- Melee
 Par 12 speed and unique buff
  Gingerbread Boxing.
 Frigg 10 speed, 12 with skin.
- Ranged
 Pur 12 speed and unique buff
  Gingerbread Marksmanship.
 Jennifer 9 speed, 11 with skin.
- Magic
 Pir 12 speed and unique buff
  Gingerbread Magic.
 Erdimien 9 speed, 11 with skin.
Partner Specialists
Depending on where and at what speed you are farming, the preferred specialist for your partner will vary. First let's go over the specialists relevant for farming :
-
 Archdaemon Amon's Specialist Partner Card. The most commonly used specialist thanks to his skill
  Provocation. Make sure you get Archdaemon Amon and not regular Amon, as regular Amon only has +1 speed while Archdaemon gives +3.
 -
 Fiona's Specialist Partner Card (S). A must have for all mages,
  Piercing Howl giving you a permanent 25% cooldown reduction as long as you recast it. If you play Tide Lord Specialist Card or Gravity Specialist Card this is the partner specialist you should use. Make sure you get Fiona and not Foxy, as Foxy only gives +3 speed while Fiona gives +4.
 -
 Akhenaton the Cursed Pharaoh (SSS) or (SS). Called Nasus or dog by most players, he's a great partner for leveling thanks to his passive buff
  Akhenaton's Aura (S). However, outside of leveling he is the best debuffing specialist for farming with his two skills
  Spectral Plague and
  Anubis' Whisper. Both of them are strong debuffs that will hit entire lures, making Akhenation ideal for players lacking in damage to clear lures. However, as a fortune wheel jackpot he is very expensive.
 -
 Bone Warrior Ragnar's Specialist Partner Card (S). Best debuffing specialist after Akhenaton with his skill
  Shadowfall. While not as good as Akhenaton, Ragnar only costs a small fraction of Akhenaton's price.
 -
 Magic Student Yuna's Specialist Partner Card (SSS). Recommended leveling partner with her passive buff
  Magic Student Yuna’s Companion (S). It increases experience gain by 20% like Akhenaton but is much cheaper.
 -
 Little Princess Venus (SSS). If you don't need Amon's pull and are not a mage, Venus is the best partner choice with her passive buff Little Princess Venus (S). Her skill
  Blossom Blast can also be used to debuff lures, but is not as good as Ragnar or Akhenaton due to the 60% chance.
Partner Equipment
While it may seem useless to give partners equipment, when farming it's important that your partner :
- Doesn't die instantly
- Keeps up with your speed
To solve that your partner needs an armor, gloves and shoes.
-
Armor
For minimal investment, go to Teoman Topp in Nosville and buy the level 90 armor corresponding to your partner's class type,
 Katol's Steel Chest Armour,
  Kertos' Leather Chest Armour, and
  Gleaming Grail's Robe. If your partner is melee also get the
  Glorious Sabre weapon. Convert the gear to partner gear at Teoman then equip it on your partner.
For better armor, I recommend upgrading and converting armor you get from Fernon raids,
 Brave Shares' Heavy Armour,
  Leather Armour of Silver Soul Glacernon and
  Mukraju's Robe. If the armor has a shell you will need to remove it with a
  Magic Eraser that you can get at Malcolm Mix.
 -
Gloves
Damned Gloves. Make a sum 5 and equip them on your partner. -
Shoes
Fernon's Shoes. Make a sum 2 with Sacred Boots and equip them on your partner. If you can't afford to buy fernon shoes for your partner, get Fast Shoes from timespace 24 or Spirit King Shoes and make a sum 2 with Sacred Boots.
Pets
Here we will go over the best pets to use for farming. Remember to always give your pet  Special Pet Food as it increases its speed, even if its not mentioned in the item description.
-
Baby Panda -
 Baby Panda's Blessing.
If you need a pull, panda is the best pet for that job with his skill Panda Roll. It's a targeted version of
  Otter's
  Sushi Party, with a much, much shorter cooldown of 30s.
His passive buff gives +10% damage, which while not being the best is also not the worst. It also gives +10% experience gain, making it the best choice for leveling.
On most maps and for most specialists panda is a requirement. However, as a fortune wheel jackpot it is very expensive.
-
Otter -
 Otter's Blessing.
A much worse version of Panda but also much cheaper. His skill Sushi Party is the same as panda's but untargeted and with a huge cooldown of 70s. While it can be used in rotation with Archdaemon Amon's Specialist Partner Card's Provocation to alleviate this problem, the cooldown is too long for use in high speed farming. -
 Beast King's Avatar -
  Beast King Avatar's Blessing.
If you don't need panda, beast avatar is a great option thanks to his buff giving +10% damage and +10% cooldown reduction. While it doesn't give the best damage buff, cooldown reduction has very few other sources. -
Pix -
 Pix' Blessing.
Best pet damage buff. If you don't need panda and don't need the cdr from beast avatar use Pix. However it is only obtainable during the Easter event, making it very expensive. -
 Pirate Bushi (Fire) -
  Fire Pirate's Blessing.
 -
 Pirate Bushi (Water) -
  Water Pirate's Blessing.
 -
 Pirate Bushi (Light) -
  Light Pirate's Blessing.
 -
 Pirate Bushi (Shadow) -
  Shadow Pirate's Blessing.
Worse and single element versions of Pix. If you can't afford Pix they are a viable alternative but I don't recommend them. -
 Mini Fire Devil -
  Fire Devil's Blessing.
 -
 Small Ice Witch -
  Ice Witch's Blessing.
 -
 Tame Queen Bee -
  Tame Queen's Blessing.
 -
 Death Lancer -
  Death Knight's Blessing.
The vessel event pets. If you're using a vessel event costume hat and don't need panda, use the corresponding one. -
 Baby Raptor Blue -
  Blue's Blessing.
Gives +5% more experience gain than panda, but his skill is useless. If you can't afford a panda and are leveling this is a good option.
Tattoos
In this section we will go over tattoos. They are a crucial part of your farming setup and should be maxed out as soon as you can. There are two types of tattoos we can use for farming, utility and damage.
-
Utility
-
 Swift as the Wind
This the only utility tattoo we will be using. It gives +1/+2/+3 movement speed at levels 0/5/9 respectively. Unless you need two damage tattoos, this should always be in your first slot.
-
-
Damage
-
 Attack Stance
The strongest damage tattoo buff. It gives +2%/+8%/+20% to all attacks at levels 0/5/9 respectively. It should always be in your second slot. -
 Piercing Gaze
A strong critical related tattoo buff. It gives +1%/+3%/+5% to critical chance and +5%/+10%/+25% damage while inflicting a critical strike at levels 0/5/9 respectively. It can make fluctuate your damage. -
 Curse Power
If you need a second damage tattoo to clear consistently this is the best option from my testing. It gives +5/+12/+30 fairy attribute and +1/+6/+10 fairy attribute per debuff you have, at levels 0/5/9 respectively. However if you play with this tattoo you must not use an armor with an anti-effect shell or rune affix, as that will significantly reduce this tattoo's strength. -
 Attack Magic
Gives 5%/10%/25% of your magic defence as attack at levels 0/5/9 respectively. From my testing it's worse than Curse Power for all classes, but it has the advantage of not needing debuffs. So in maps where mobs have debuffs you don't want to receive this is a better option.
-
So the default farming tattoo page is Swift as the Wind +9 and Attack Stance +9.
If you need two damage tattoos, your page would be Curse Power +9 and Attack Stance +9. It also happens to be the raid tattoo page for mages.
If you want to match the raid tattoo page for archers, swordmans and martial artists, your page would be Piercing Gaze +9 and Attack Stance +9.
If you need two damage tattoos and you're farming a map with bad debuffs, your page would be Attack Magic +9 and Attack Stance +9 instead.
Skill Books
This part will list all the skill books an end game PVE player should have learned.
-
 Journal of the Forgotten Hero D (1)
 - Journal of the Forgotten Hero S (1)
- Journal of the Forgotten Hero J (1)
- Journal of the Forgotten Hero D (2)
- Journal of the Forgotten Hero S (2)
- Journal of the Forgotten Hero J (2)
-
Journal of the Akamur Merchants (1)
-
Attack Strategy of Lord Cuarry's Knights (1)
-
Attack Strategy of Lord Cuarry's Knights (2)
- Bear Loa Tome - Not necessary but recommended, can be dropped by farming the Celestial Spire rift.
- Dragon Agility Textbook
- Dragon Intellect Textbook
- Dragon Power Textbook
Titles
Here we will go over the best titles to use.
-
Indefatigable+1 movement speed. Best title for speed farming. Obtained while leveling.
-
Templar, Robin Hood, Arch Mage, Black Belt+5% to all attacks. Good title for damage as it works on all mobs. Obtained while leveling.
-
Animal Lover, Hunter, Dragon Hunter.
+10% damage to low-level animals, monsters and dragons respectively. If a specific mob is harder for you to kill, use the appropriate title. Animal Lover and Hunter are obtained while leveling, Dragon Hunter is obtained by completing the act 8 main quest. -
Ancelloan's Herald+2% lifesteal, +1% manasteal. Best title for chill farming, you will never need to use potions with this title. However it is useless if you are luring with pets as it doesn't heal them, so you will still need to use potions. Obtained by completing 100 Fernon raids.
-
Midas' Touch+5% gold gained. Use this title if you are stacking gold gain effects. Bought for 100kk at Eva Energy.
Consumables and Special Items
This part covers the consumables and special items used when farming.
-
 NosMate Guardian Angel and
  Partner's Guardian Angel. Lets your pets respawn instantly, make sure to have a large amount in your inventory at all times.
 -
 Guardian Angel's Blessing. Increases the speed of your pets by 2. Must use if you are luring with pets.
 -
 Fairy Booster. Increases your fairy attribute by 30 for 1 hour. Cheap and significant damage boost, should always be used.
 -
 Divine Recovery Potion. Instantly refills all your HP and MP. Becomes free after farming for some time. Crafted with
  Dragonjuice at the Alchemist in Dragonveil.
 -
 Alchemist's Beverage. 10 Minutes
  Attack Potion,
  Defence Potion and
  Energy Potion in one. The duration stacks when using multiples at once. Becomes free after farming for some time. Crafted with
  Reptilian Meat at the Alchemist in Dragonveil. Should always be used.
 -
 Ice Flower Oil. Increases damage dealt by 5% for 10 minutes. The duration stacks when using multiples at once. Can be farmed in bulk by losing money at the God's Altar in Nosville. Significant damage buff, recommended to always use when farming.
 -
 Fafnir's Fried Dinner. Cleanses level 3 and below debuffs. Most expensive potion in the game, should only be used when trying to get a new record.
 -
 Tarot Card (The Sun),
  Tarot Card (The Devil). +1 movement speed and +250 to all attacks. Best damage tarots, use either one if you need damage.
 -
 Tarot Card (Fool). + 1 movement speed and +10% gold gain. If you don't need damage this is the best tarot to use.
 -
 Wing of Return (Infinite),
  Amulet of Return (Infinite) and
  Bell of Sweet Home (Infinite). Very useful since you won't ever need to buy them again. You can trade them for 999 of the regular version at Malcolm Mix.
Extras
This part will list useful information and outside resources.
Rift loot money calculator
A spreadsheet made by Chaos and me to calculate how much money you earned in your farming session. To use it, either download it and open it in excel, or go to File > Make a copy, then modify the values in your copy. Make sure you edit the prices of items you sell in bazaar.