Pony's World Slayer Guide
If you want to reach out to me to ask any questions, correct or add some information to this guide, please reach out to me on Discord. My user id is ponywarrior.
Introduction
Hello dear reader, you've found your way to the definitive guide to world boss time-spaces. This guide is written by myself, Pony ![]() , with many contributions major and minor from multiple players who I would like to credit : Sakayume
, with many contributions major and minor from multiple players who I would like to credit : Sakayume ![]() , Shaper
, Shaper ![]() , Astray
, Astray ![]() , Roxas
, Roxas ![]() , Antares030
, Antares030 ![]()
![]() , Kitten
, Kitten ![]() , Synixx
, Synixx![]() , Kanzs
, Kanzs![]() , hawthorne
, hawthorne![]() .
.
With that out of the way, let me explain what this guide will cover. For those unaware, Olympus has a unique feature called World Bosses. For the full details follow the link, but to summarize a random boss spawns in the world every 6 hours and 30 minutes, and once defeated a time-space opens for 1 hour. The time-space can be completed as many times as you are able to within this hour, and this guide will help you do as many as possible.
For now this guide only covers 2 of the 4 world bosses, Mole Mother and Evil Overlord Paimon.
Shared Gear
This part will cover the general gear used for world bosses, which is almost the same as end game raiding. Eleuse has already made this detailed gear guide, though missing the act9 additions it covers all the basics so anything already explained in their guide will be summarized or skipped here. Gear specific to a single world boss will be covered in their section.
Flower
Before a World Boss, you should always have a  Wild Sound Flower ready, as it's a huge damage boost for the first 10 minutes. Make sure you don't party with your duo/trio before everyone has it, as if someone in a party kills monsters it counts for all members, even on different maps. The best spot to farm a flower quickly is the bees rift on Eastern Skytrail.
Auxiliaries
-
Mask :
 Miner Mask crafted with
  Mullan Accessory Production Scroll
 -
Hat :
 Mullan Felt Hat very cheap in bazaar and/or
  Laurena's Witch Hat.
 -
Gloves :
 Steam Gloves or
  Dragonlord Gloves, obtained in Ultimate Arma and Asgobas Instant Combat respectively.
 -
Boots :
 Fernon's Shoes or
  Fast Shoes which can be bought at Teoman Topp, along with
  Steam Shoes or
  Dragonlord Shoes.
 -
Jewelry :
 Element Band
 Element Ring
 Element Necklace, ideally rolled with max HP and crit damage reduction, crafted with Mullan Accessory Production Scroll.
 -
Trophies :
 Twilight Gem III and
  Chronos' Hourglass III.
 -
Costume wings :
 Rocketeer Wings (Permanent),
  Paimon's Costume Wings (Permanent) and
  Pharaoh Costume Wings.
 -
Costume weapon : Geisha (
 Imp Cudgel Skin (Permanent),
  Wildflower Bow Skin (Permanent),
  Uchiwa Skin (Permanent),
  Jasmine Gauntlets)
 -
Costume hat : Any 5% damage hat or
 Viking Helmet (Permanent)
 -
Costume :
 Rocketeer Costume (Permanent) or any +2 move speed costume.
 -
Titles :
- Firehound : +5% soft crit chance and +5% soft crit damage. Best overall damage title, unlocked by doing 100 kertos raids.
-
Pets : Don't forget to +10 your pet's attack and defense.
 Baby Panda Best pet for luring.


 Lupis Best damage pet for crit classes.
 Pix Best damage pet for mages.
Consumables
Before a World Boss you should have prepared these items. For the ones with a duration, use them once the World Boss is close to death.
-
 NosMate Guardian Angel and
  Partner's Guardian Angel : Lets your pets respawn instantly, make sure to have a large amount in your inventory at all times.
 -
 Guardian Angel's Blessing : Increases the speed of your pets by 2 for 1 hour. Can be bought at the loyalty shop for 2 coins.
 -
 Fairy Booster : Increases your fairy attribute by 30 for 1 hour. Can be bought at the loyalty shop for 5 coins.
 -
 Bottle o' Blessing : Gives the same buffs as the druid, but can be used anywhere. Can be bought at the merchant in Nosville for 1kk, make sure to always have some.
 -
 Divine Recovery Potion : Instantly refills all your HP and MP. If you farm regularly you shouldn't need to buy them, otherwise buy at least 100 before each World Boss.
 -
 Alchemist's Beverage : 10 Minutes
  Attack Potion,
  Defence Potion and
  Energy Potion in one. The duration stacks each time you use it. Costs close to nothing, if you farm you'll have a ton of them.
 -
 Ice Flower Oil : Increases damage dealt by 5% for 10 minutes. The duration stacks each time you use it. Can be farmed in bulk by losing money at the God's Altar in Nosville.
 -
 Fafnir's Fried Dinner : Cleanses level 3 and below debuffs. Very expensive for a single use item, but only way to get rid of untimely debuffs.
 -
 Tarot Card (The Sun),
  Tarot Card (The Devil) : +1 movement speed and +250 to all attacks. Use either one. Randomly obtained from
  Tarot Card Game, which you can get from either the altar or buying them at the loyalty shop.
 -
 Medal of Adventurers : Small damage boost but lasts a whole week. Crafted with Raid Tokens.
Partner
-
Partners : The jackpot partners, thanks to their class based +5% attack buff skill and having the highest movement speed of all partners. Ideally you have all 3, but you should at least have the one for your class.
- Melee :
 Par
Par - Ranged :
 Pir
Pir - Magic :
 Pur
Pur
- Melee :
-
Partner weapon : The damage is irrelevant, however the debuffs they can inflict are very useful. Which is why the best choice are the arena weapons, since they only cost 10kk and have the same debuff as the c88 weapons. Do note to remove them when doing event raids / pollutus as they don't do any damage otherwise.
- Partner : Dagger
- Partner : Bow
- Partner : Wand
-
Partner armor : Your partner randomly dying will lose you time so you want to avoid this by giving them a decent armor. Ideally get a c83 armor of the corresponding class, up the rarity to r7-8 and upgrade it to at least +8 before transforming it into partner gear.
-
Partner equipment : Equip them with
Fernon's Shoes or Fast Shoes and any glove with enough resistances to bring your partner to 100% in all elements.
Weapon Shells
Priority order is from top to bottom.
- Main weapon :
- S-Increase Overall Attack
- A-Increase Damage to High-Level Races
- A/B/C-Enhanced Attack
- B/C- Increase Damage to Low-Level Races (top priority for Mole Mother)
- B/C-Increased Chance of Critical Hits, B/C-Increased Critical Damage
- C-Undisturbed When Casting Spells
- Secondary weapon :
- S-Increased Overall SL + A-Increased SL Attack >= 25, A-Increased SL Element
- S-Increased Overall SL + A-Increased SL Element >= 25, A-Increased SL Attack
- Rune : At least 15/21 with good stats and a level 4 power slot.
Artefact Fusion
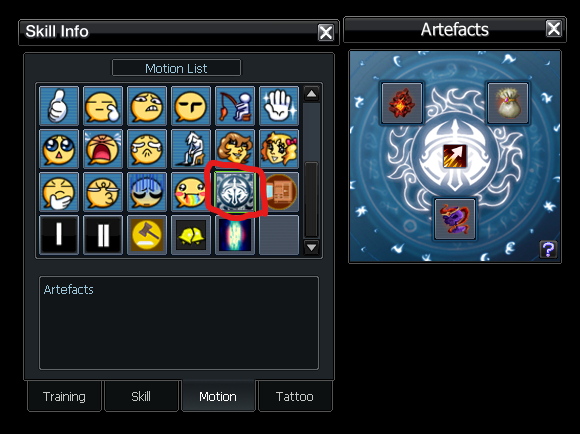
If you've never heard about olympus' multiverse content, check it out here. Here we'll only be looking at artefact fusion, a permanent buff you gain by equipping a set of 3 specific artefacts. To equip artefacts, you need to open the artefact window, which is found at the bottom of the motion tab of the skill window. Then you can click the ? icon to see all the fusions and which artefacts you need to gain the buff.
Here are the useful fusions you can get :
 Hasten +0 : Default fusion to use everywhere, does not need any upgrade.
 Master of Time +0 : Great if you struggle with your cooldowns or can't have
  Agility Power (Level 6), but needs to be upgraded for the full effect.
 Fire Spirit's Favor +3,
  Water Spirit's Favor +3,
  Light Spirit's Favor +3,
  Shadow Spirit's Favor +3 : Same buff for each individual element. Best for damage but not by much, and is only worth using fully upgraded.
Pet Training
If you're unfamiliar with this feature, check out the official guide here. For our purpose the only thing that matters is rolling  Mad Grab 5 or
  Mad Grab 6 on your pets, as having an extra provoke is always very useful. Do note it's extremely grindy.
Fairy
Act 9 has introduced a new tier of fairies and a new upgrading system for them, which are both huge money sinks. This is the last thing you should focus on!
Relevant to end-game, there are 4 tiers of fairies :
- Divine
 Elkaim
 - Erenia/Zenas
 Zenas (Fire)
 Erenia (Fire)
 - Fernon
 Fernon (Fire)
 - Drone
 Fire Element Steam Drone
Since any fairy can be upgraded and drones can be crafted all the way down from divine fairies, on paper you can upgrade your divine fairy and keep the upgrades every time you craft it to a tier higher up to a drone. However you need to carefully check the market prices to determine beforehand if either crafting a drone or buying one directly is the cheaper option, as the market is constantly changing.
Once it's time for you to upgrade your fairy (for PvE!), here is what you should do :
- Upgrade your fairy to +6, no matter what options you get. All the important options can only be obtained from +7 to +9.
- Upgrade your fairy to +7 : if you don't roll All attacks are increased by X% / by X, use a
 Fairy Restoration Set on your fairy and try again.
 - Upgrade your fairy to +8 : if you don't roll All attacks are increased by X% / by X, use a Fairy Restoration Set on your fairy and try again.
- Once at +8 with these two options, the last option you can roll has a much smaller impact than the two previous ones, especially because you can only have two S options; and it is far more expensive to try for. Unless you have all your drones +8 already don't try it.
- Upgrade your fairy to +9 : if you don't roll your option, use a Fairy Restoration Set on your fairy and try again.
- Increases critical hit chance by X%
- Increases the equipped fairy's element by X
- Upgrade your fairy to +9 : if you don't roll your option, use a
- Once you are done upgrading your fairy, double click a
 Fairy Converter to reroll the ranks of your fairy's options. Do this until both All attacks are increased by X% and All attacks are increased by X are rank S, and if your fairy is +9, until your last option is also rank A.
Shared Mechanics
In this part I will go over important mechanics relevant to all world boss timespaces.
Pet Control
This section will cover how to control your pets, as good pet control is required in all world boss timespaces.
In Olympus, you can control your pets with different keys : F1, F2, F3, F4, A, S, D, F.
Command Keys
The ones that matter the most are the commands keys, ASDF.
A : Attack move. After a press, click an area and your pets will go there, attacking any enemies on the way. Once arrived they will stay there, but will retaliate if attacked by enemies.
S : Stop. After a press, your pets will stop and stand in place until they die or you order them again.
D : Return. After a press, your pets will move towards you.
F: Move. After a press, click an area and your pets will go there, ignoring any enemies on the way. Once arrived they will stay there, but will retaliate if attacked by enemies.
Control Keys
The control keys, F1-4, change which character you control when pressing them. Theoretically they allow the greatest pet control, but in practice require really good multitasking and practice.
When switching control, the characters that become inactive (orange circle) will follow the last command issued.
F1 : Control player. Pet and partner become inactive.
F2 : Control partner. Player and pet become inactive.
F3 : Control pet. Player and partner become inactive.
F4 : Control all. Returns control of your player with your pets following.
Note : You can also Ctrl+Left click drag an area to select multiple characters to control, for example Player+Partner or Partner+Pet. Important in Evil Overlord Paimon if you play  .
.
Recommended Usage
It's best to focus on the SDF command keys as they are the simplest way to control your pets. Most importantly, with the Move (F) key you can click on the minimap instead of the ground to send your pets somewhere.
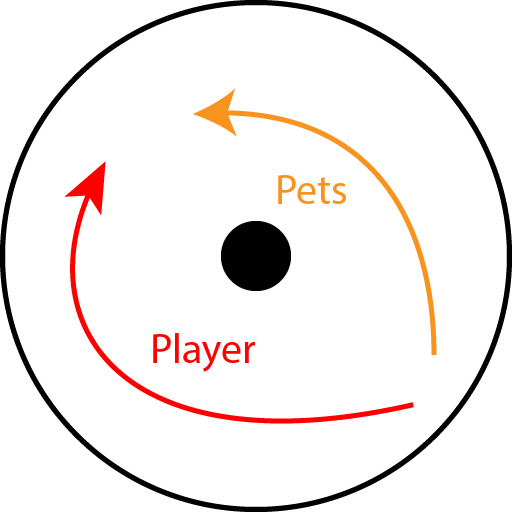
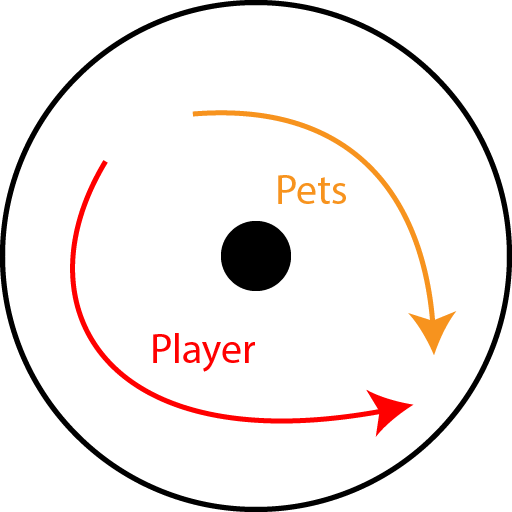
Therefore the recommended flow of commands is the following :
Move (F) your pets around to lure mobs, Stop (S) your pets where you want to clear the lure so they don't spread the mobs around, make your pets Return (D) after the lure is cleared.
Stagger
Stagger is a mechanic, or more likely a limitation of the game client, that happens when the player or a pet is hit. A stagger animation is played, which normally doesn't affect you much. However when you receive many hits at once you become staggered; the stagger animation is played over and over and you will be unable to use any skills. Anyone who has farmed has experienced this since it's very common.
To exit this stagger state, the only way is to move.
Dealing With Stagger
To deal with stagger, there are two methods. The first and obvious one is to move, however it usually is not ideal since all the mobs you have lured around you will also move randomly.
The second and ideal method might sound illogical, but it is to use skills; while you cannot use skills while you are staggered, you can use skills before getting staggered. Then, if you immediately use another skill, you will cast the skill and avoid stagger entirely, the reason being skill animations can't be interrupted by the stagger animation.
So in short, the best way to deal with stagger is to start using skills immediately after you stop moving, and to continue chaining skills until your lure is dead.
However, it's very important to note that your pets can and will be staggered too, especially in Mole Mother's mid room. Worse is they can kind of self 'stagger', as if your pet is attacking they won't move or use their skill. So to avoid stagger on your pets the best method is slightly different than for the player; make your pet move to where you want to clear your lure with F, then stop them with S so they don't attack, then you can use their skill.
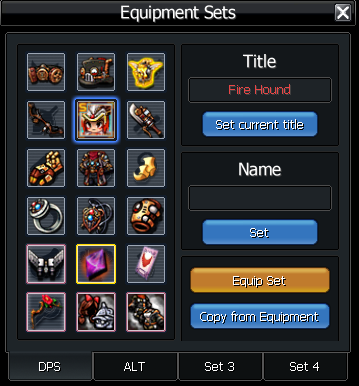
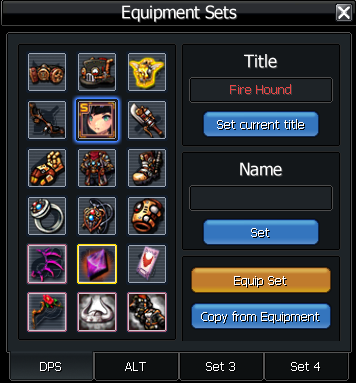
Equipment Sets
Equipment sets are a feature exclusive to Olympus, which allows you to switch between registered sets of equipment. While you can do the same manually and you can't change sets during combat, they are very convenient to use and also the best way to switch titles. To use this feature, simply open your skill window on the Motion tab and scroll to the bottom.
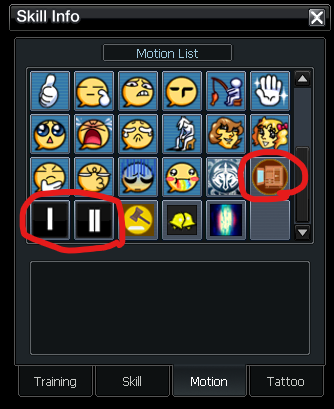
The brown icon is the equipment sets menu, where you can manage your sets, while the black icons are the shortcuts to change to a set. If you only have one icon you need to unlock the second set with a key, which can be crafted with loyalty coins. Then open the menu.
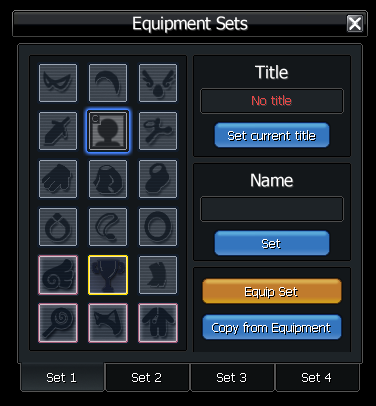
Here you're able to manage your sets, which is pretty self-explanatory. Before a world boss make sure to double check you have the right sets saved and the shortcut icons in your skill bar.
Starting the Time-Space
To actually start the time space, one player in the party needs to step on the time-space and click the start button. Then the other player(s) need to step on the time-space and accept the prompt to join. This is very simple, however it needs to be optimized to not lose time.
One player in the party needs to be designated as the time-space starter. This person needs to always start the time-space as fast as possible, so it's best to pick the person with the lowest ping. Then the other player(s) need to quickly join the time-space. For both roles the best method is spamming C immediately after exiting the previous time-space. For the time-space starter this will quickly pop the time-space window so they can click start, while the joiners need to keep spamming C until they see the join prompt and press Enter.
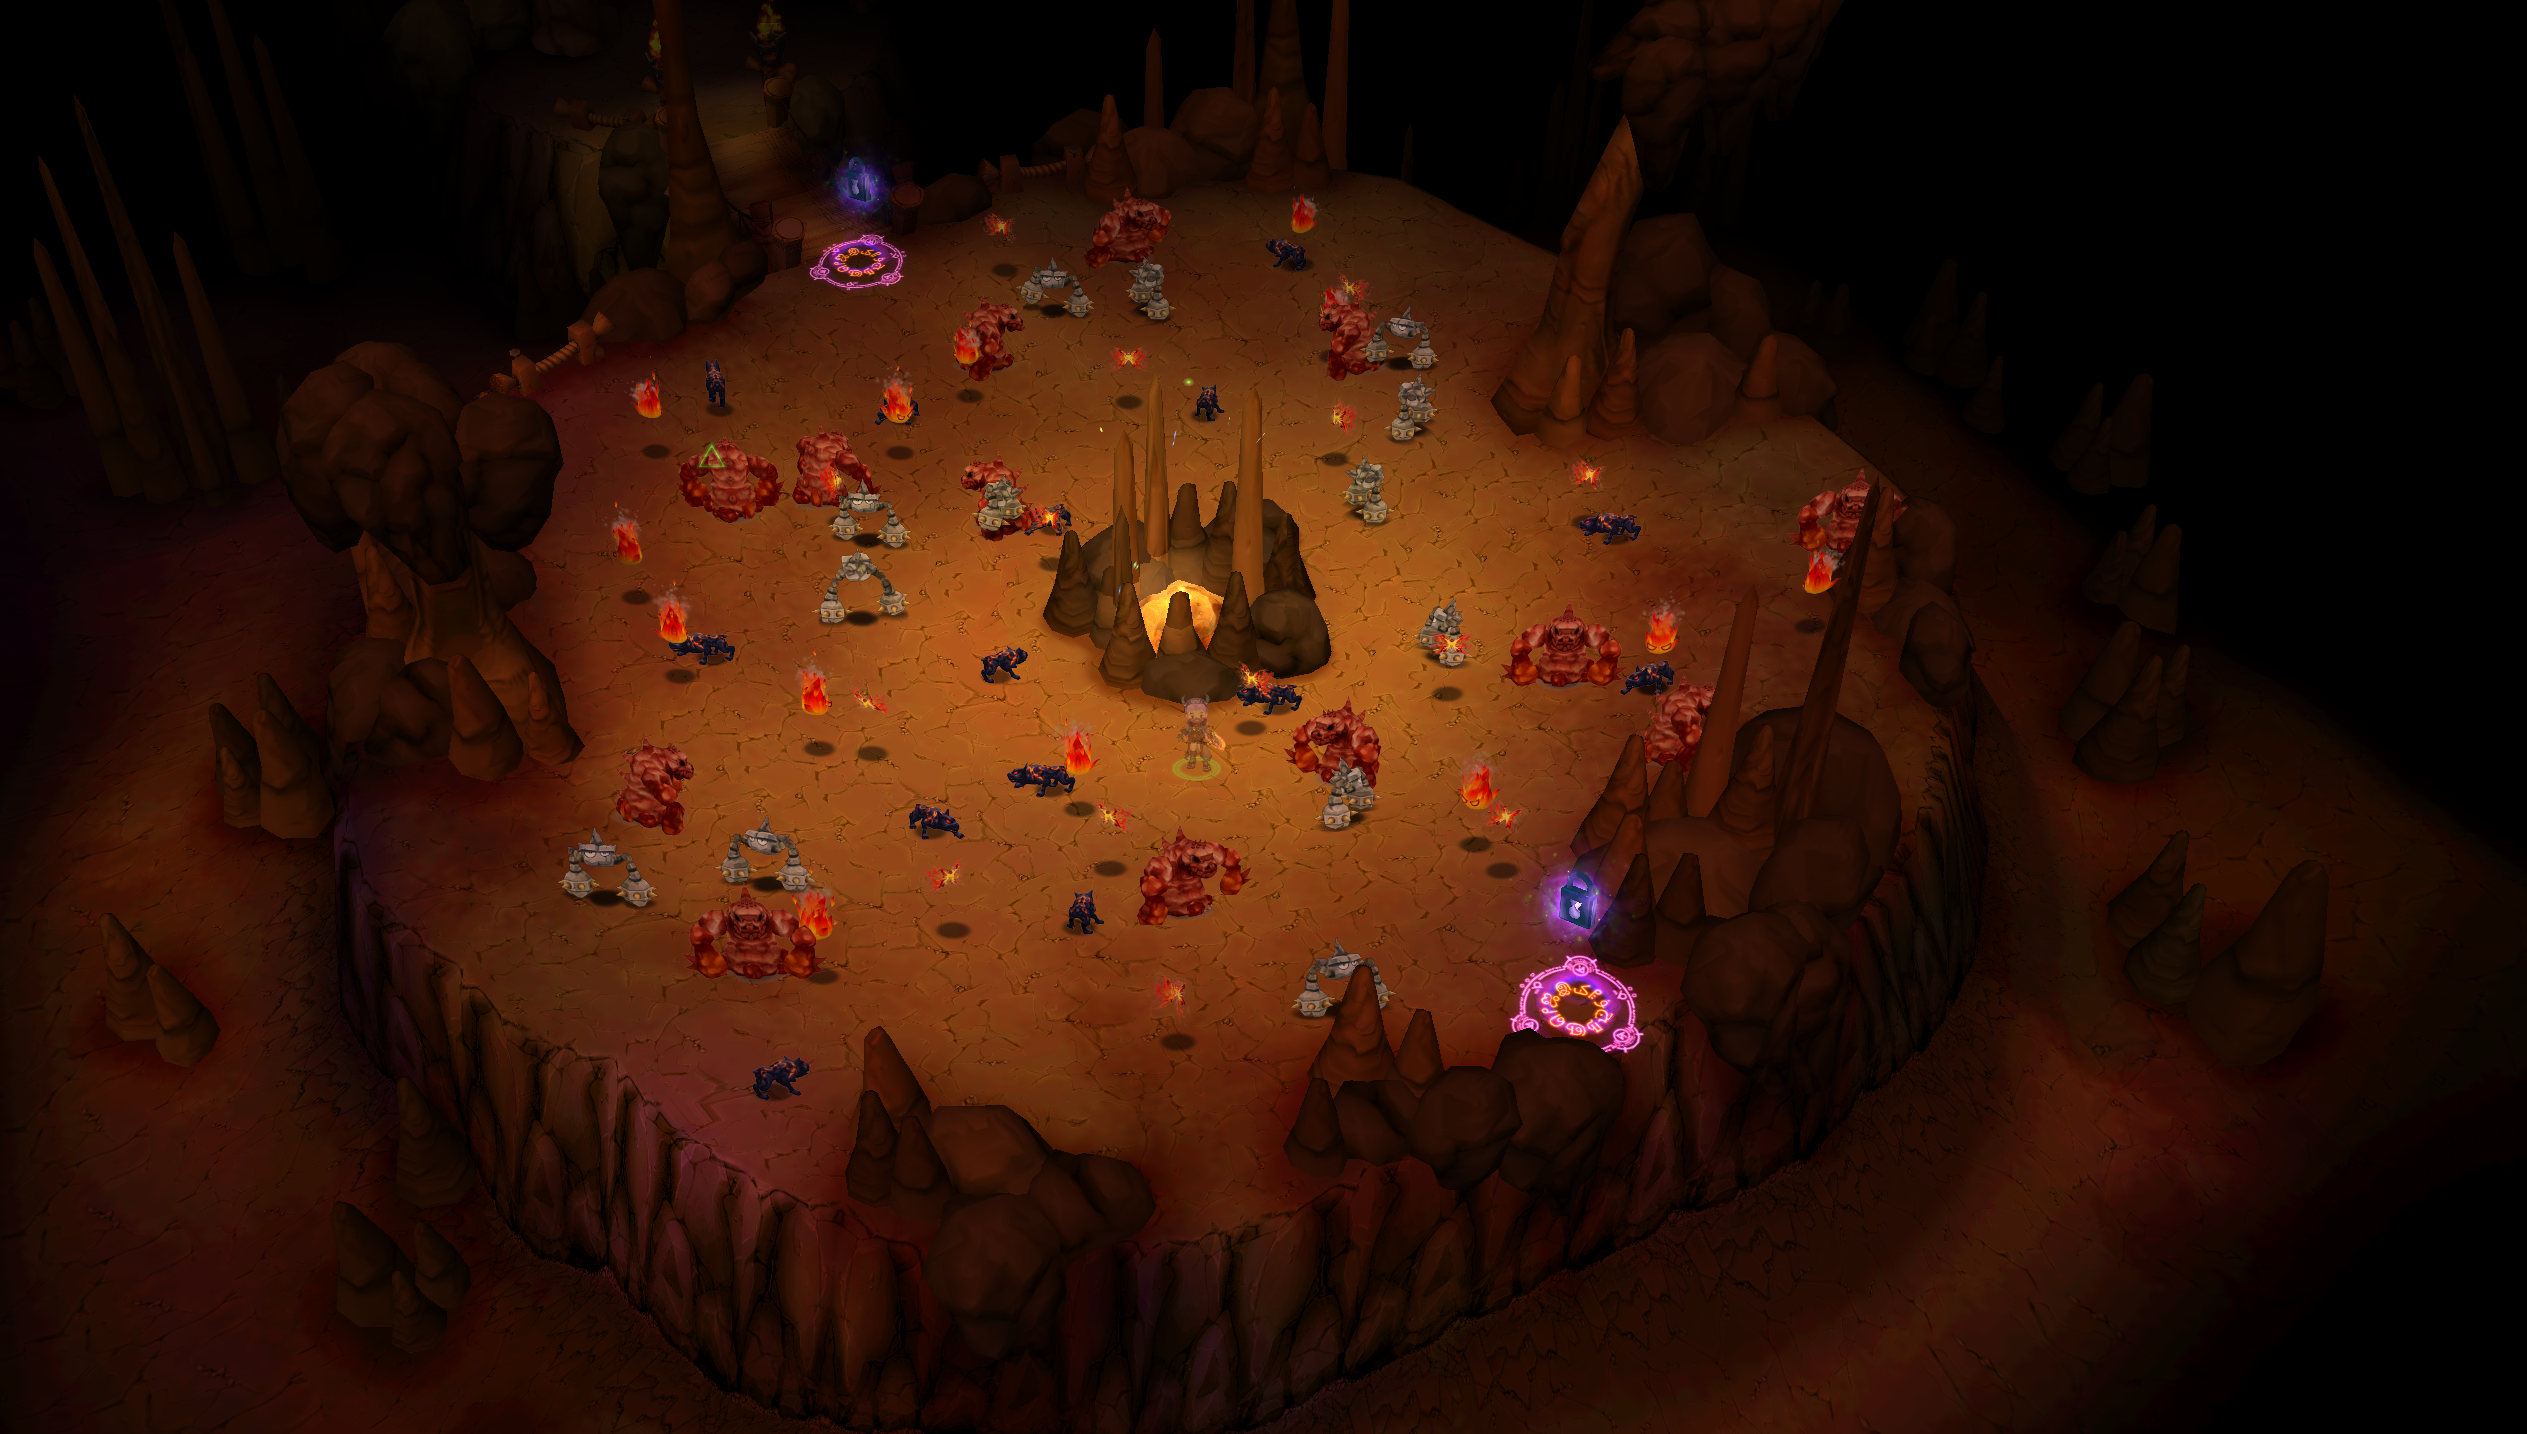
Mole Mother
Overview
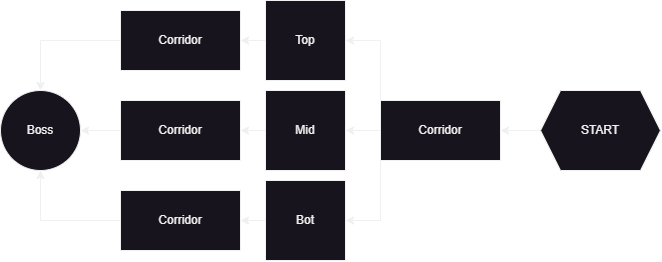
The Mole Mother time-space requires a party of 3 players to complete. It starts in an empty room, where the party leader must take the portal for the party to enter the first room, a corridor. This corridor ends with 3 doors leading respectively to the top, mid, and bot rooms. Here each player must enter a room, where they will face 5 waves of enemies. Each room must be cleared for the party to be able to advance to the boss room, where they must a slay a weak version of the Mole Mother.
The challenge of this time-space is clearing your room as fast as possible, to then quickly go kill the boss and repeat the time-space. The top room has light element melee monsters, it is the easiest to clear. The mid room has fire element ranged and melee monsters, it is the hardest to clear. The bot room is a donut shape and has water element ranged and melee mobs, its difficulty is in-between mid and top. And finally the boss room is empty except for the boss, which is very weak.
How many time-spaces your party can complete in an hour depends on how fast each player clears their room, which makes the slowest player the limiting factor. In a team with equal gear, skill and experience it will be the mid player.
Gear
Gear specific to this world boss timespace.
Auxiliaries
-
The AoE set : With all 3 pieces you gain +1 AoE range on all your offensive skills, except ones which have a special area. Wildly inconsistent without all 3 pieces. Some specialists require it in order to perform at all, but it comes at a significant damage and financial cost. A specialist that uses the AoE set will never be better than one that doesn't need it, however it is not always possible to assemble the perfect team, and the AoE set opens more alternatives to fill a team.
-
 Laser Sword (Permanent)
 Laser Bow (Permanent)
 Laser Wand (Permanent)
 Laser Glove (Permanent)
-
 Creepy Monk Headgear (Permanent)
 Black Mecha Flame Wings (any color)
-
-
Hat :
Laurena's Witch Hat useful but inconsistent, often used as a crutch by beginners and required by low tier specialists. -
Costume hat :
 Wizard of Noz Hat (Permanent) this is even better than Viking Helmet (Permanent) or a vessel hat thanks to its buff having good uptime.
 -
Costume wings : If you need cooldown reduction use
Pharaoh Costume Wings, otherwise Rocketeer Wings (Permanent). -
Titles :
- Firehound : +5% soft crit chance and +5% soft crit damage. Best title for all rooms as soft crits are rolled for each individual target you hit.
- Animal Lover : +10% damage to low level animals, best title for top and bot if you don't have firehound.
- Hunter : +10% damage to low level monsters, best title for mid if you don't have firehound.
-
Partner specialists : If you don't need Jinn to clear effectively, it's best to use your class' primary PSP so you can use it with your respective jackpot partner.
-
 One-Winged Perti Specialist Partner Card,
  Sheriff Chloe's Specialist Partner Card
 -
 Laurena's Specialist Partner Card
  Jinn's Specialist Partner Card Use if you need the provoke.
Rune Powers
The best weapon rune power to use is Agility Power (Level 6), as its activation chance is per target you hit. This means while clearing your room it is constantly active once you start attacking, and is a big boost to your clearing speed at high level. For your armor the best power is  Power of the Flame (Level 6), even at level 1 it is nice to have.
Equipment Sets & Trophies
If you are using the AoE set, you need to prepare a set with the hat and weapon skin (set 1), and a set with a damage costume hat and your geisha weapon skin (set 2). Before entering your room equip set 1, then after clearing your room equip set 2 for the boss.
Then for everyone, switching between Twilight Gem III and Chronos' Hourglass III is required for maximum speed. While traveling you need to have hourglass equipped, and when dealing damage you need to have the gem equipped. Simply equip the hourglass in the corridors, then the gem in your room and at the boss.
Example Full Builds
Your build should look like the left if you don't use the AoE set, or the right if you use the AoE set. Note if you use the AoE set, remember to make a damage set like the left one for the boss.
Tier List
The rankings are from F to S, but for clarity's sake the lowest tier shown is C. A specialist's ranking are based on these criterias :
- How well can the specialist perform?
- How much investment is required for the specialist to perform well?
- How difficult is the execution?
- Has anyone been able to clear 45 or more time-spaces in an hour with it? (To the best of my knowledge)
- Gear, skill level and experience are considered equal.
For specialists ranked in the same tier, the best starts from the left to the worst on the right.
| Top path | Mid path | Bot path | |
|---|---|---|---|
| S |    |  | |
| A |   |   | |
| B |  |  | |
| C |
Top Path
Overview

Monsters :
 Large Jellyfish
 Strong Punkie
 Brutal Lion Wolf
 Beast
Cursed Beast
Beast
Cursed Beast
The top room is a large circle with a small obstacle in the middle. It contains only light element melee monsters. It is much easier to lure since the monsters are melee, and much easier to clear thanks to the elemental advantage of shadow against light being 200%.
For beginners, it is the best room to start with. In a team of equal gear, skill and experience, the top player should always be the first to clear their room.
Mid Path
Overview
Monsters :
 Flame Butterfly
 Hellhound
 Angry Flame
 Fire Slade
 Stonewalker
The mid room is a large circle with a small obstacle in the middle. It contains a mix of melee and ranged fire element monsters. This room is the hardest of all rooms, first because having ranged mobs means you require provocation skills and better luring, but mostly because of the extreme stagger inflicted by the mobs, which heavily punishes any mistake. Also, due to the elemental matchup there are few good specialists options here.
For beginners this is the worst room to start with, and should be avoided. In a team of equal gear, skill and experience, the mid player should always be the last to clear their room.
Bot Path
Overview
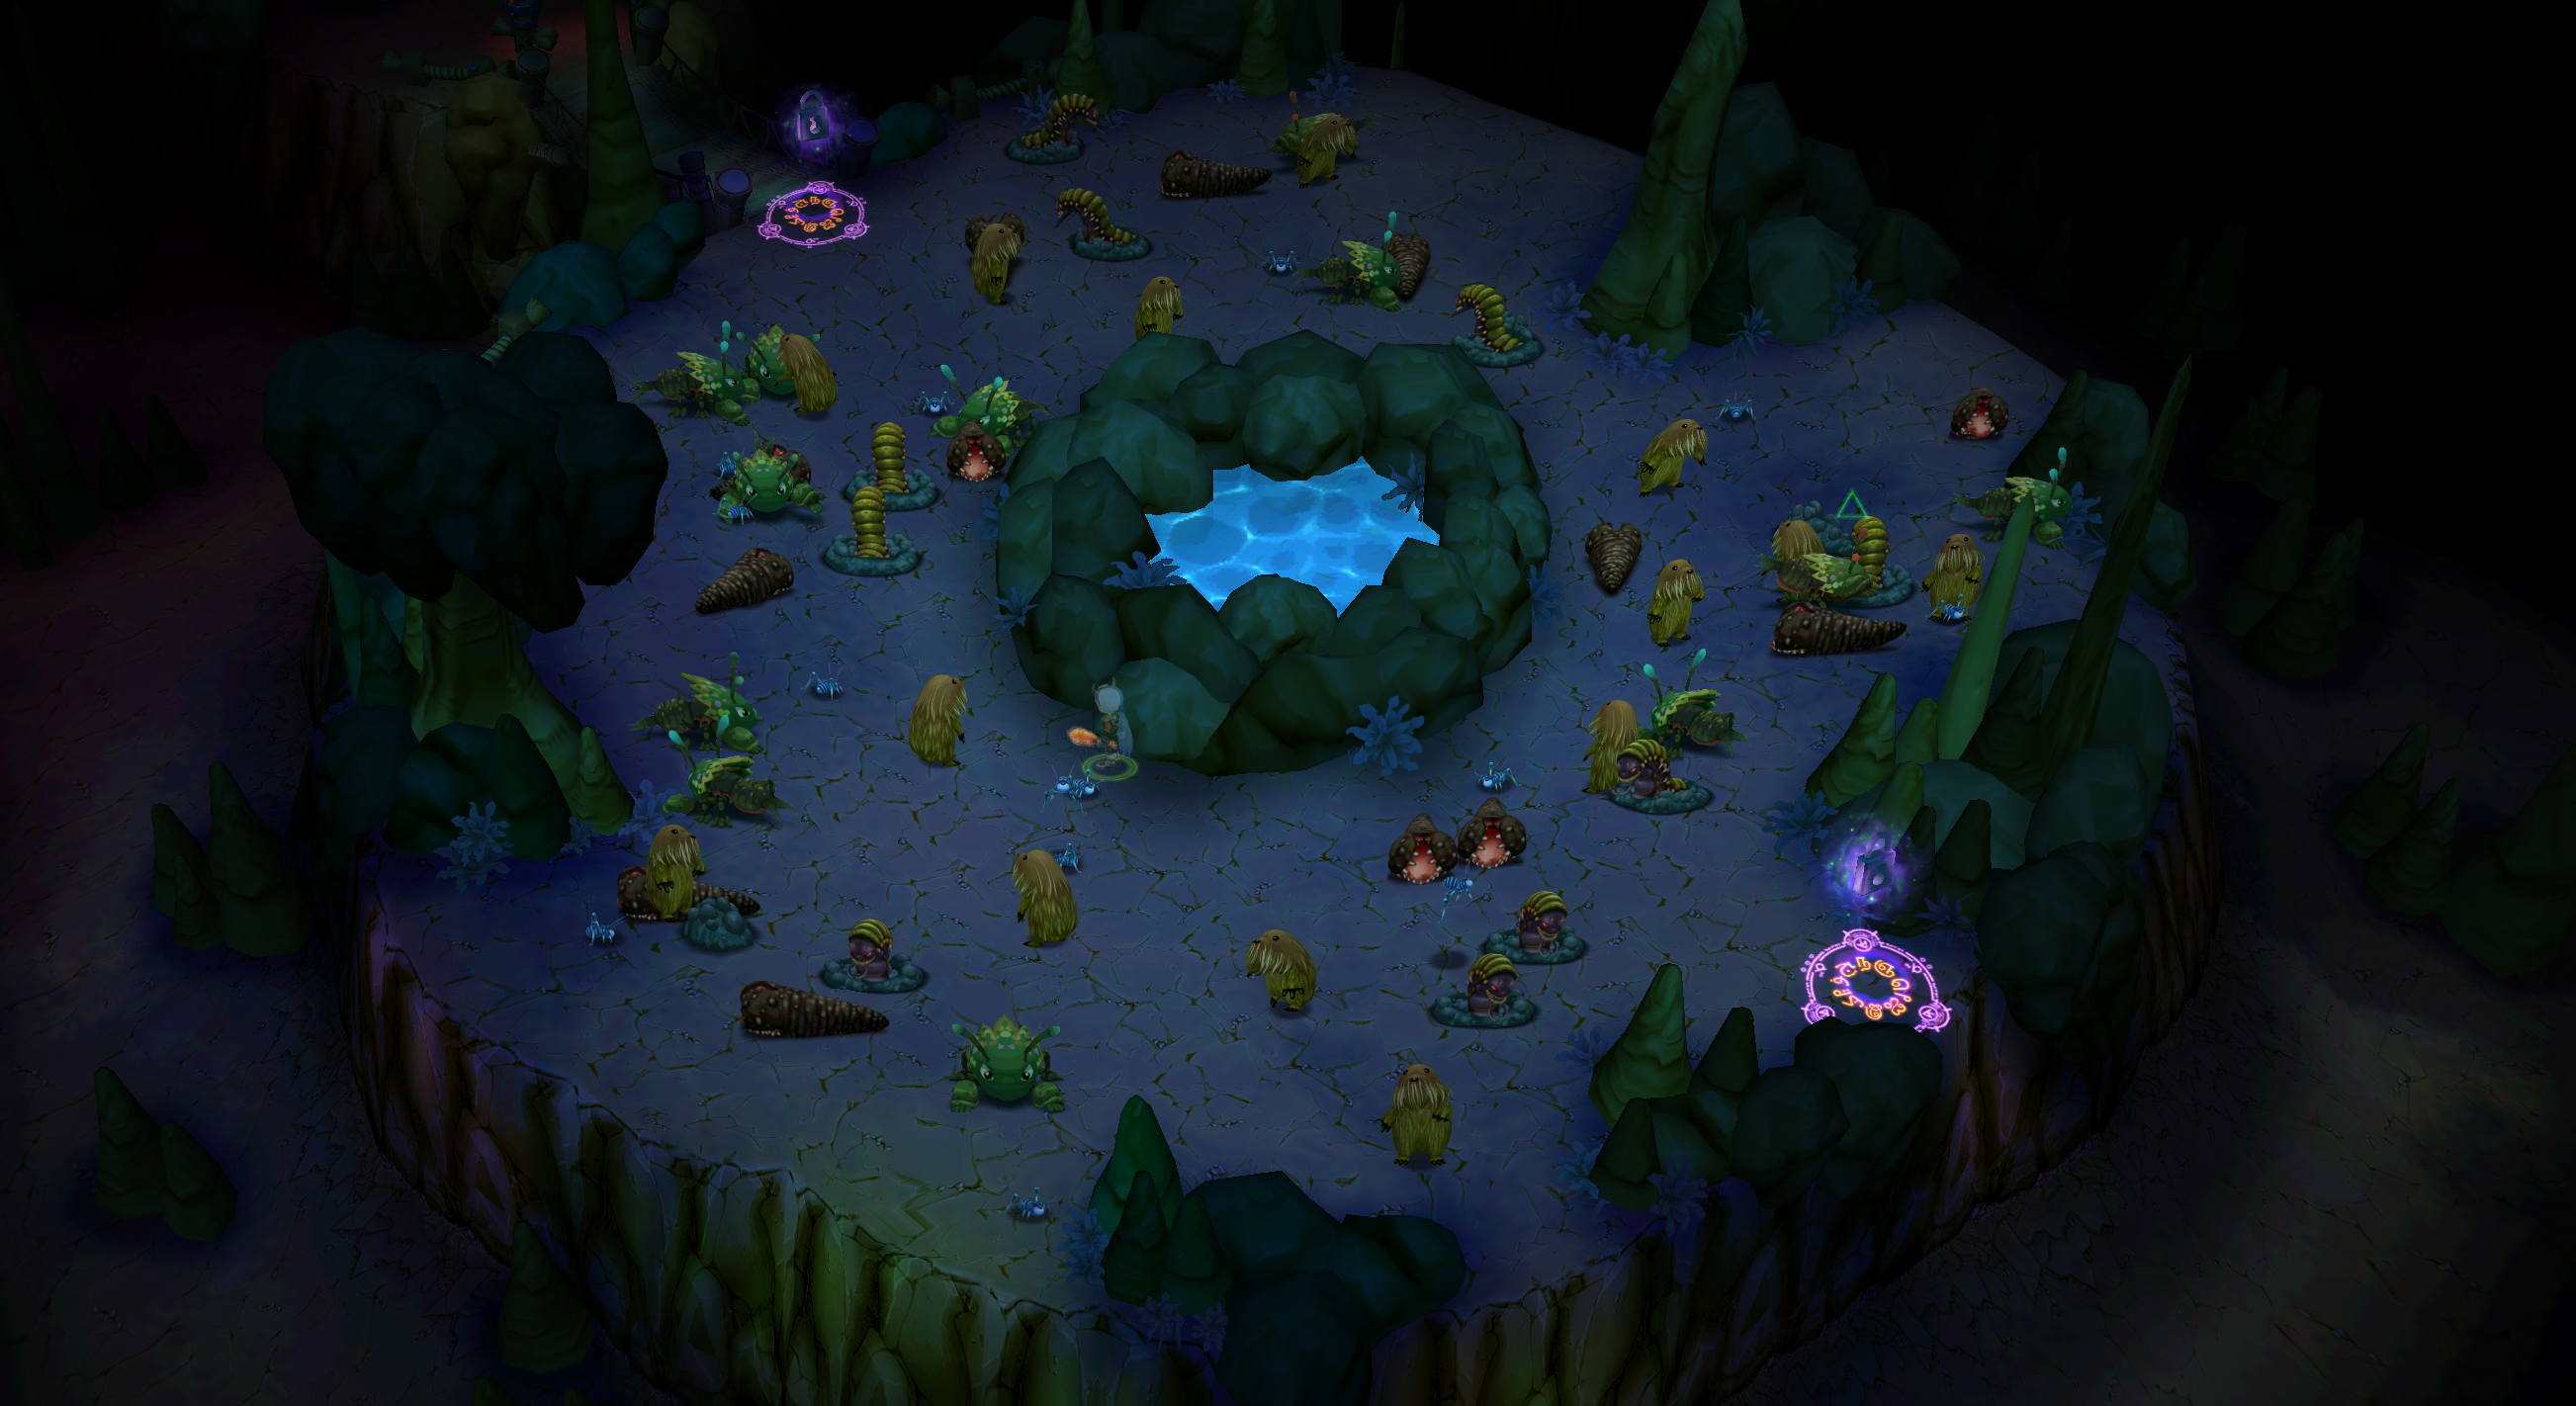
Monsters :
 Young Mole
 Water Grasshopper
 Mole Cricket
 Giant Leech
 Larva
Larva
The bot room is a large donut. It contains a mix of melee and ranged water element monsters. This room is harder than the top room, but easier than the mid room. The difficulty of this room comes from having ranged mobs, which means you require provocation skills and better luring, and the shape of the room making luring harder. You might not think the shape of the room is a problem at first, until you start using your provocation skills and wonder why some mobs stay stuck on walls; the geometry of the center circle does not play nice with provocations, so you need to be careful where you use them.
For beginners this isn't the best room to start with, but it's much more doable than mid. In a team of equal gear, skill and experience, the bot player should always be the second to clear their room.
Clearing Your Room
In every room you have to clear 5 waves of 67 enemies, for a total of 335. This results in you having to do 5 lures, and although each specialist clears them differently the fundamental technique is the same. You need to split your room in half and lure one half yourself and the other half with your pets. Then you meet in the middle and clear the lure to spawn the next wave. You do this 5 times and the door opens, letting you and your team continue to the boss.
Specialists Guides
Looking for authors for any specialist that doesn't have a guide yet! Contact me on discord : ponywarrior .
In this part you will find individual short guides for each specialist, separated by tiers. Each tier is how many timespaces are completed within an hour by the author, so follow the one most appropriate to your current gear and skill levels.
52+
Berzerker Top
Requires Jinn and Panda with Mad Grab 5!
Author : Astray
Right after joining the time-space use  Life and Death for the speed buff.
On your first lure use  Big Swing until next wave spawns, if it only took 2 uses keep the last one for the next lure.
On your second lure use  Split Tornado, followed by panda's provoke. Finish with auto attacks.
On your third lure use  Bash, followed by your panda's Mad Grab 5 (make sure your pets are on S!). Finish with auto attacks.
On your fourth lure use Big Swing until next wave spawns, if it only took 2 uses keep the last one for the next lure.
On your last lure use Bash, followed by Jinn's voke for final clear so mobs are locked and don't run away. Finish with auto attacks.
After clearing last lure use Life and Death for the speed buff.
If you are first in boss room use  Break Armour on the boss.
After boss is dead use  Berserker along with your tattoos.
Gravity Mid
Requires Jinn and Panda with Mad Grab 5!
Author : Sakayume
Note you can use  Push and
  Pull instead of autos to finish a lure, thanks to their bigger AoE and short cooldowns. Laurena's Witch Hat can be used but is not needed.
On your first lure use  Gravitation Field and panda's provoke, finish the lure with autos or push/pull.
On your second lure use  Squash and jinn's provoke, finish the lure with autos or push/pull.
On your third lure use  Zero Gravity and either Push or Pull , finish with an auto if the next wave didn't spawn.
On your fourth lure use Gravitation Field and Mad Grab 5, then finish with autos or push/pull.
On your last lure use any AoE skill before using panda's provoke, then use  Black Hole and kill any survivors with autos or push/pull.
After the boss is dead use Zero Gravity along your tattoos to stack blue bar and get  Excessive Anti-Gravitation Field. Refresh
  Hyper-Gravity every other time-space.
Fire Canoneer Bot
Requires Jinn and Panda!
Author : Pony
The best option to clear bot for archers is Fire Cannoneer Specialist Card, thanks to its elemental advantage and massive AoE. I recommend using jinn and panda for more consistent times, even though technically you only need panda. I strongly recommend having Agility Power (Level 6) (at least level 3) as it helps a lot, but it's doable without, just slower. Having Pir and at least Mad Grab 5 on your panda are nice optimizations but not required. Also, remember to put your pets on S before clearing your lures. During flower phase use Pharaoh Costume Wings if you have them, switch back to Rocketeer Wings (Permanent) after flower.
Note : when using  Rocket Riding make sure you're facing a wall or you will teleport away from your lure and lose time.
When you enter the room immediately use  Weapon Master while sending your pets to start luring.
On your first lure, use  Signal Rocket. If you have Mad Grab 5 use it (don't forget to put pets on S), otherwise use your panda's provoke right after, then clear the lure with 1-2 autos.
On your second lure, use  Hellfire and Rocket Riding. If the next wave didn't spawn use
  Staggered Fire or 1-2 autos if you don't have agility power.
On your third lure, use Staggered Fire or an auto while the mobs are gathering. Use Rocket Riding facing the wall.
- During flower phase : The next wave should have spawned, but if it didn't use an auto.
- During no flower phase : Use
 Ultimate Cannon, if you have pir use
  Gingerbread Magic to cancel the animation. This should always spawn the next wave, but if not finish with an auto.
On your fourth lure use Staggered Fire during flower phase. Use Signal Rocket during no flower phase.
- If you have Mad Grab 5 and used it on the first lure, use your panda's provoke and finish the lure with 1-2 autos.
- Otherwise use Staggered Fire and Rocket Riding.
- Make sure you don't use Hellfire!
On your last lure :
- During flower phase : Use Ultimate Cannon, if you have pir use Gingerbread Magic to cancel the animation and use jinn's provoke immediately. Use Rocket Riding towards the exit portal, if a mob survived use an auto.
- During no flower phase : Use Staggered Fire then Rocket Riding and jinn's provoke during the animation then finish the lure with autos. If some mobs did not get pulled by Jinn, for example stuck on a wall, make sure you lure closer to the exit portal, away from the center wall.
- Make sure you don't use Hellfire!
On the boss immediately use Hellfire, if  Fatal Burn didn't proc use Staggered Fire and hope to proc Burn. Then use Signal Rocket and
  Shot with Targeting, if the boss is still alive finish it with autos.
Use your tattoos after the boss died.
48+
Demon Hunter Top
Author : Pony
The best option to clear the top room for archers is DH, thanks to its elemental advantage and short cooldown, high damage, AoE combo. It also does not need any provokes, which means you can use One-Winged Perti Specialist Partner Card to kill the boss faster and Lupis for more damage. If you find it too difficult to do this without any provokes, start with Jinn and Panda. Once you feel more confident you can drop Jinn for  Archdaemon Amon's Specialist Partner Card, as ele is a decent debuff for the boss and he has a provoke if you need it. Then drop Amon or Panda for Perti/Lupis, until you don't need any provokes. Note if you train your lupis you can still have a backup provoke too.
The luring method here is different than normal, as you need the mobs to only be attacking you before clearing a lure, so that your  Vengeful Spirit Pendulum 1 combo hits the most amount of mobs. What you need to do is start luring normally, then when you meet with your pets you need to send them away from the lure, which will make all the monsters target you. It's a bit tricky to learn at first, but with practice you can do it quickly.
The trick to do well with DH is to master the use of your Vengeful Spirit Pendulum 1 combo. If you use it without a target, or on a target that isn't right next to you, you will dash forward and not hit most of the monsters that were around you. To avoid this, you want to spacebar only right before using it as it will select the closest target. Then after each tap of the combo you want to make sure you still have a target selected before tapping again; if not, you need to quickly tap spacebar only once. If you press spacebar more than once you will do an auto attack, losing time and likely getting staggered.
This next part will differ based on whether you have Agility Power (Level 6) (at least level 3), which I really recommend.
- If you don't have agility power, you need to use Master of Time +0 and Pharaoh Costume Wings. Otherwise you will lose a good few seconds from having to wait for your combo cooldown.
Ideally you want to clear your lures only with your combo, except for the first and last lure, and in the rare cases your lure doesn't die after your full combo. On the first lure, to avoid using your combo without the cooldown reduction from agility power, you want to use  Vengeful Spirit Rain first. This clears a nice chunk of your lure and procs agility power. It should only take 2 hits of your combo to finish the lure so you then have 4 combo hits for the third lure, which can carry over the rest of your lures if you have great damage and play well.
-
If you don't have agility power, spend the extra cooldown time on making sure you have lured every monster. Then time your stop with the cooldown of your combo.
-
If your lure does not die after your full combo, your backup skills are
 Spirit Explosion and Vengeful Spirit Rain. If both are on cooldown do not use
  Soul Sword, and this means you need more damage or provokes.
On the last lure use Soul Sword first, as thanks to its massive range you don't need to wait for mobs to get closer before casting it and half the mobs will get a massive debuff. If you have a provoke use Spirit Explosion before using it, then finish with your combo. Otherwise use your combo and finish with Spirit Explosion if there any mobs still alive.
When you lure make sure you only stop moving when your combo cooldown is up to avoid stagger, and stay aware of your  Weak Berserk Spirit status as it's easy to forget to rebuff thanks to the inconsistent duration.
Once at the boss is where DH truly shines; run up to the boss and use your PSP debuff on it if you have it, then use  Throwing Blade and quickly chain to
  Moon Shadow Pendulum. Then make sure you check where you ended up before using your combo, as you will whiff your combo if you didn't end up right next to the boss. Unless you get terrible luck this will kill the boss with flower or leave it in red without.
Use your tattoos after the boss died. Refresh Weak Berserk Spirit if it expired, the best time to do it is after boss died, when entering top room and before/after a lure.
Seer Top
Requires Panda with Mad Grab 5!
Author : Sakayume
On your partner equip Laurena's Specialist Partner Card.
On your first lure use  Confusion and panda's provoke, finish the lure with autos.
On your second lure use  Cursed Hands and
  Blade Changer.
On your third lure use your remaining hits of Blade Changer then  Death Cage, finish the lure with Confusion.
On your fourth lure use Cursed Hands and your panda's Mad Grab 5, then use Blade Changer.
On your last lure use your remaining hits of Blade Changer followed by panda's provoke, finish the lure with any AoE skill and/or autos.
On the boss use Laurena's debuff then Blade Changer.
After the boss is dead use  Blink and your tattoos.
Seer Bot
Requires the AoE set, Jinn and Panda with Mad Grab 5!
Author : Sakayume
On your first lure use Confusion and panda's provoke, finish the lure with autos.
On your second lure use Cursed Hands and Blade Changer.
On your third lure use your remaining hits of Blade Changer then Jinn's provoke, finish the lure with Death Cage.
On your fourth lure use Confusion and your panda's Mad Grab 5, then use Blade Changer.
On your last lure use your remaining hits of Blade Changer then Panda's provoke, finish the lure with any AoE skill and/or autos.
Use Blade Changer on the boss.
After the boss is dead use Blink and your tattoos.
45+
Wild Keeper Mid
Requires the AoE set!
Requires Jinn and Panda!
Author : Pony
The best option to clear mid for archers is Wild Keeper Specialist Card, thanks to its decent damage and great AoE. As it requires the AoE set it is a backup solution however, but can still achieve a very decent clear time.
I strongly recommend having at least Mad Grab 5 on your panda as it makes your third lure much more consistent. Also, remember to put your pets on S before clearing your lures.
On your first lure use  Snake Rush, followed by your panda's provoke. Finish with auto attacks.
On your second lure use Snake Rush or  Boomerang Throw if it's still on cooldown. Use your jinn's provoke and finish with auto attacks, make sure you do an extra auto after the next wave appears to clear the mobs still rooted by jinn.
On your third lure use Snake Rush followed by  Forest Power, if your panda has an extra provoke use it. Finish with autos.
On your fourth lure use  Ivy, Snake Rush and Boomerang Throw. Finish with autos if the next wave didn't appear.
On your last lure use Snake Rush and 1-2 autos before using your panda's provoke. If there are some mobs that didn't get provoked use auto before using jinn's provoke. Finish the lure with autos.
On the boss switch to your damage set, use  Elemental Leech on the boss if you are not the last to enter the room.
Don't forget to use  Eagle Spirit with your tattoos after the boss died.
Demon Hunter Bot
Requires the AoE set, Jinn and Panda!
Author : Synixx
Recommended to have Mad Grab 5 on your panda.
If you don't have Agility Power (Level 6) (at least level 3), you need to use either  Helm of Darkness III or Master of Time +0 and Pharaoh Costume Wings.
While using your Vengeful Spirit Pendulum 1 combo, make sure you have a target selected between each attack or you will miss.
On your first lure, use your panda's provoke then your Vengeful Spirit Pendulum 1 combo.
On your second lure, use your jinn's provoke then your Vengeful Spirit Pendulum 1 combo.
On your third lure, if you have Mad Grab 5 on your panda use it, then your Vengeful Spirit Pendulum 1 combo. If you don't have it, use your Vengeful Spirit Pendulum 1 then Spirit Explosion or Vengeful Spirit Rain.
On your fourth lure, use your Vengeful Spirit Pendulum 1 combo then Spirit Explosion or Vengeful Spirit Rain.
On your last lure, use Soul Sword before using your panda's provoke (if available), then finish with your Vengeful Spirit Pendulum 1 combo.
Swap to your damage set at the boss and use your tattoos after it died, and remember to keep Weak Berserk Spirit up.
Evil Overlord Paimon
Overview
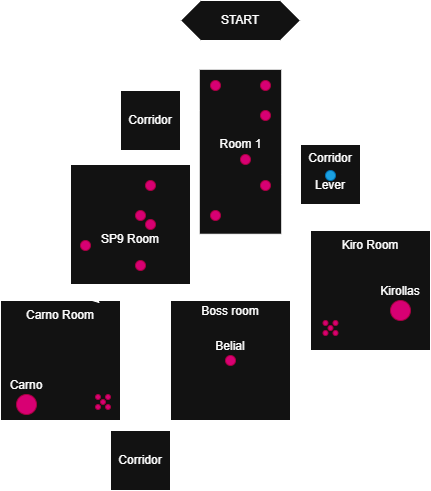
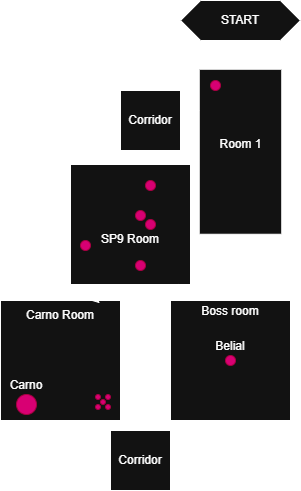
The Evil Overlord Paimon time-space requires a party of 2 players to complete. It starts in a long empty room, where the leader needs to enter the portal to start the time-space. Then the players arrive in Room 1, where they must split up on two different paths to reach the boss : Carno's path and Kiro's path. Both end up with the players facing a boss on their own, before finally facing the boss Belial together. Kiro's path is easier to complete, while Carno's path is more difficult. All 3 bosses are shadow element, which means the only viable specialists in this time-space are light element. A large part of the time-space is running so having great movespeed is required.
Bosses :
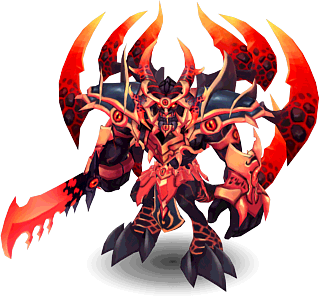
 Twisted Spirit King's Shadow
 Twisted Beast King's Shadow
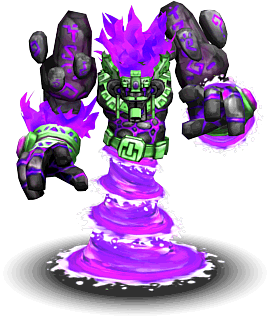
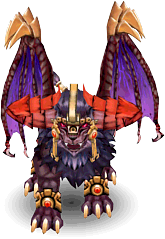
 Demon God Belial
Gear
Gear specific to this world boss timespace.
Auxiliaries
-
Amulet :
 Wind Rune Saves a good amount of time over a sun/devil tarot thanks to the extra movespeed, but not worth using if you're already much faster than your partner. Obtained from
  Mother Nature's Rune Chest which is obtained at the arena of talents' shop, if you don't play PvP buy it in bazaar.
 -
Specialist wing :
 Zephyr Wings If your specialist does not have a lot of movement speed this is essentially required to be competitive. If you are consistently slower than your partner you most likely need these. Eventually as you keep improving you will need them to keep improving no matter your specialist and path.
 -
Titles :
- Firehound : +5% soft crit chance and +5% soft crit damage. Doing more soft crits equals killing bosses faster, but can't help if you are unlucky.
- Zenith : +10% damage to high level monsters. Works on the SP9 clones and all bosses, if you don't have firehound this is the best damage title.
- Indefatigable : +1 movement speed. Needs to be on your second set.
-
Partner specialists : You need to have your class' primary, secondary and elemental PSP, so that you can use it with your class' jackpot partner and use their buff.
- One-Winged Perti Specialist Partner Card,
 Palina Puppet Master's Specialist Partner Card, Archdaemon Amon's Specialist Partner Card
 - Sheriff Chloe's Specialist Partner Card,
 Daniel Ducats,
  Guardian Lucifer's Specialist Partner Card
 - Laurena's Specialist Partner Card,
 Harlequin's Specialist Partner Card,
  Freya's Specialist Partner Card
Rune Powers
The best rune power to use here is  Curse Power (Level 6), though it has to be at least level 4. It's a nice damage boost on carno, kiro and belial.
Equipment Sets & Trophies
While running you need to be using a set maximizing movement speed and while attacking bosses you need to be using a set maximizing damage (see next section below for details). As equipment sets can't be switched during combat and have a cooldown you will also need to switch between Twilight Gem III and Chronos' Hourglass III manually whenever you can't switch sets, for damage and movement speed.
Example Full builds
Your build should look like this. On the left is your damage set for bosses, and on the right your movement set.

Tier List
The rankings are from F to S, but for clarity's sake the lowest tier shown is C. A specialist's ranking are based on these criterias :
- How well can the specialist perform?
- How much investment is required for the specialist to perform well?
- How difficult is the execution?
- Has anyone been able to clear 28 time-spaces in an hour with it? (To the best of my knowledge)
- Gear and skill level are considered equal.
For specialists ranked in the same tier, the best starts from the left to the worst on the right.
| Kirollas' path | Carno's path | |
|---|---|---|
| S |  |  |
| A |  | |
| B |  | |
| C |
PSP Setups and progression
Which PSPs you and your partner take depends on how long it takes you to kill your boss and Belial. This can be summed up easily by looking at how many time-spaces you're able to clear in an hour.
- 25 and below : Both players take primary and use it on theirs bosses, then use one after the other on Belial.
- 26 - 29 : One player takes primary and the other elemental. During flower PSP debuff is not used on Kiro and Carno.
- 30 and beyond : Carno player takes primary and Kiro player takes secondary. Both never use their PSP debuff on Kiro and Carno for the whole hour.
Kiro's Path
Overview
Monsters :
 Shadow Sorceress
 Corrupted Orc Mage
Twisted Spirit King's Shadow
Corrupted Orc Mage
Twisted Spirit King's Shadow
Kiro's path is the easier of the 2 paths. It consists of first killing 5 of the 6 target mobs in the Room 1, your partner killing the first 1, which opens the door to the adjacent corridor containing the lever that opens the path for your partner. Once your partner has cleared the SP9 room the door to the Kiro room will open. In this room you must first kill the group of monsters at the bottom left of the map to spawn Kirollas, which you then must kill. Killing it opens your partner's door to the boss, and once they kill Carno in their room your door opens. Once you enter it you will face Belial with your partner.
General Clear Method
Because of the simplicity of this time-space, every specialist will clear this path the same way, only some details differing for some specialists. The only major difference on this path is in Room 1 : whether your specialist has a teleportation skill or not changes how the room is cleared.
-
Room 1 (With teleportation) : Immediately after entering the room F click the minimap on mob 4's position, sending your pets to lure it. Run to mobs 1-2-3 and kill them, then teleport over the wall. Press D to recall your pets then F click behind you so mob 4 keeps running towards you. Run up to it and kill it then run to mob 5, kill it, and take the portal.
-
Room 1 (Without teleportation) : Immediately after entering the room F click the minimap on mob 2's position, sending your pets to lure it. Run to mob 1 and kill it, then run down along the left side wall towards mob 4. Once your pets have lured mob 2 F click the minimap on the wall close to mob 3's position. Kill mob 4 and press D before going back to your pets. Press S, if your pet has a provoke use it then kill mobs 2 and 3. Run to mob 5, kill it, then take the portal.
-
Corridor : Click next to the lever and press X once you are next to it. Use your tattoos during the loading. Take the portal once it's open.
-
Kiro's room : Click the bottom left on the minimap then F click your minimap on Kiro's spawn location, sending your pets there. Once at the pack of mobs kill them then press D once Kirollas has spawned to recall your pets and lure it towards you. Use or don't use your PSP debuff on Kirollas, then kill it. Take the portal to the boss room once it's open.
-
Boss room : Run to Belial and attack it, use your PSP debuff as soon as possible.
Carno's Path
Overview
Monsters :
Shadow Sorceress
 Voodoo Priest Spirit
 Waterfall Berserker Spirit
 Sunchaser Spirit
 Sun Wolf Spirit
 Flame Druid Spirit
 Belial's Sorcerer
Twisted Beast King's Shadow
Belial's Sorcerer
Twisted Beast King's Shadow
Carno's path is the harder of the 2 paths. It consists of killing the first target monster in the room 1 to save time for your partner, then entering the first portal to enter a corridor to the SP9 room. In this room you need to kill 5 SP9 shadow clones to open your partner's door. Once your partner has used the lever on their side the door to Carno's room opens. In this room you must first kill the group of monsters at the bottom right of the map to spawn Carno, which you then must kill. Killing it opens your partner's door to the boss, and once they kill Kirollas in their room your door opens. Once you enter the corridor the next door leads to the boss room where you will face Belial with your partner.
General Clear Method
Because of the simplicity of this time-space, every specialist will clear this path the same way, only some details differing for some specialists. The only major difference on this path is in the SP9 room : whether you lure all the shadows together or kill them one by one. Note this side requires having a provoke if luring in SP9 room. If doing 1b1 SP9 room it's preferred to have primary for the shorter cooldown.
-
Room 1 : Quickly kill the first target mob then take the left corridor to the SP9 room.
-
SP9 Room (lure) : Run up to voodoo and make sure you aggro'ed it, run down past sunchaser and wolf. Once at the bridge F click your pets a little past the bridge and leave them there, otherwise voodoo will get stuck. Run past druid and up to berzerker, then press D and run back towards your pets. Once you reach your pets use your tattoos, then provoke the clones and use your PSP debuff on them. Kill all the clones, then take the portal to Carno's room once it's open.
-
SP9 Room (1b1) : Use your tattoos right after entering, then run to voodoo and kill it. Run right up to sunchaser and target her. Once the wolf has attacked you use your PSP debuff followed by AoE skills to quickly kill both. Run over the bridge and kill the druid, then run to berzerker and kill it. When you're done run to the portal to Carno's room and enter it once it's open.
- All the non-target monsters disappear once all the shadow clones are dead. If you see mobs while running to the portal that means you missed a clone and your partner's door is still locked!
-
Carno's room : Click the bottom right on the minimap then F click your minimap on Carno's spawn location, sending your pets there. Once at the pack of mobs kill them then press D once Carno has spawned and your pets have reached him to recall your pets and lure it towards you. Use or don't use your PSP debuff on Carno, then kill it. Take the portal to the corridor once it's open, then enter the boss room.
-
Boss room : Run to Belial and attack it, use your PSP debuff as soon as possible once you're both there.
Specialists Guides
Looking for authors for any specialist that doesn't have a guide yet! Contact me on discord : ponywarrior .
In this part you will find individual short guides for each specialist.
Kiro's path
Sunchaser
Author : Pony
Except for archmage, sunchaser is the only competitive specialist for Kiro's path, thanks to having a teleport. It's also a very strong DD thanks to its many debuffs it can apply on Kiro and its extremely fast sidestep auto attack loop.
In Room 1, clear as normal. On mob 3 use  Lightning Fury, then run to the wall and use
  Rapid Retreat to teleport over it. Be careful not to spam or take too long to use the follow up.
Once you enter Kiro's room, go to the pack of mobs on the bottom left while sending your pets on Kiro's spawn as normal. However your wolf will teleport to your side anytime it gets too far, and you need it to use your combo skills. Before reaching the mobs you need to Ctrl + Click drag and select both you and your wolf.
Once at the mobs press D and lure the mobs with wolf, try to pack them as much as possible. Click a mob in the center and use  Solar Shower on it. Then use your
  Solar Eruption combo to clear any remaining mobs, again make sure to click the center of the remaining mobs.
When Kiro spawns press F4 to reselect all your pets then D to start luring Kiro towards you.
Run to Kiro and use your PSP debuff on it if you need to, then use your  Spear of Binding and
  Light Net combos. This will inflict a lot of debuffs on Kiro, significantly boosting your damage. Finish it with autos.
At the boss use your PSP as soon as you can. Only attack with your sidestep auto attack loop. Once the boss is dead use  Nature's Healing and
  Call of the Wild.
During the hour you'll have to manage your wolf's health; because you can't heal it with potions it will eventually die after a few time-spaces. To counter this, I recommended you craft  Hamburger to heal your wolf. They can be crafted in bulk at Eva Energy and are extremely cheap to make. If your partner is an Archmage Specialist Card, you can ask them to use
  Illumination on your wolf after Belial dies, in which case your wolf dying should never be an issue.
Archmage
Authors : Sakayume & Kitten
Preferred PSP is elemental.
In Room 1, clear as normal. After mob 3 use  Holy Jump to teleport over the wall.
At the lever, do not use  Fast Lane or your Pir's Gingerbread Magic.
In Kiro's room go to the bottom left while sending your pets on Kiro's spawn as normal. Once you reach the pack of mobs lure them and try to pack them as much as possible. Click a mob in the center and use  Light Catalyst then
  Holy Explosion. If mobs survived finish them with autos or
  Suppression.
Press D to lure Kiro to you once it spawned. Once you reach it use your PSP debuff on it (unless it's flower), use Light Catalyst and  Sacred Mist. Combined with your PSP, this inflicts -50 light resistance on Kiro. Use Fast Lane and your Pir's Gingerbread Magic, then use Holy Explosion for a big hit before finishing Kiro with autos.
After killing Kiro or after entering the boss room, use Holy Jump.
Use your PSP debuff on Belial as soon as you can. After it dies refresh  Spellbook Scholar.
Note if your partner is a Sunchaser Specialist Card, use Illumination on their Sun Wolf after Belial dies if you can.
Carno's path
Wildkeeper
Author : Pony
Wildkeeper is a decent choice if not the best, due to having 0 bonus movement speed. However it is the easiest specialist to play for archers thanks to its massive AoEs and  Elemental Curse making Carno and Belial easier to kill. If you want to use it past 26 ts/hour it will be difficult without Zephyr Wings.
Room 1 is done as normal.
In the SP9 room, once you have provoked all the clones and used your PSP debuff on them use Forest Power, Boomerang Throw and Snake Rush. This should have killed every clone, if not finish them quickly with autos. Do not use Ivy as you need it for the mobs in Carno's room.
In Carno's room go to the bottom right while sending your pets on Carno's spawn as normal. Once you reach the pack of mobs lure them and try to pack them as much as possible. Use Ivy and Snake Rush, if any mob survived kill them with autos or Boomerang Throw if the cooldown is up. Then go to Carno, debuff it with your PSP if needed and Elemental Leech. Quickly kill it with autos and make your way to the boss room.
In the boss room use your PSP debuff as soon as it's available. If Belial is at 50% HP or less when your Elemental Leech is available, it is likely not worth using it due to the long cast time. If it happens most of the time you should keep Ivy for Belial and not use it on Carno.
Once Belial is dead refresh Eagle Spirit. Also refresh  Wolf Spirit for the extra attack, if you and your partner are ok with the downside (if a pet dies they will lose the buff, unlike the druid's buff).